

Microsoft Planner(Premium) Tenant to Tenant Migration Guide
Introduction
The Apps4.Pro Migration Manager guide provides a step-by-step process for migrating Microsoft Planner Premium plans along with tasks between tenants or within the same tenant using Apps4.Pro Migration Manager.
It covers the entire components of Premium Planner, including tasks, buckets, assignments, attachments, comments, due dates and much more.
It could also help to move Microsoft Planner Premium plans to a new or existing Microsoft 365 Group, or to a new or existing Team.
Scope of Microsoft Premium Planner Migration
The migrated and non-migrated items are listed below for Microsoft Planner Premium plans Migration.
Limitations
- There is no hard limit on the number of tasks, attachments or comments migrated by Apps4.Pro beyond Microsoft’s API limits.
- For a Premium Plan, Goals ordering and Dependency ordering are not supported due to API limitation.
Roles & Licenses for Premium Planner Migration
- Valid Microsoft 365/Office 365 License with “Microsoft Planner” app enabled is required for Source & Target Connector Accounts.
- Valid Microsoft Planner Plan 3 or Microsoft Planner Plan 5 license is required for Source & Target Connector Accounts.
- System Administrator role in the Dataverse environment OR Global Administrator is required for both Source & Target Connector Accounts.
Note: These roles are required to ensure the service account has sufficient permissions to read, write, and manage project data stored in the Dataverse environment. - Source Connector Account should be a Member of the Premium Plans that you choose to migrate.
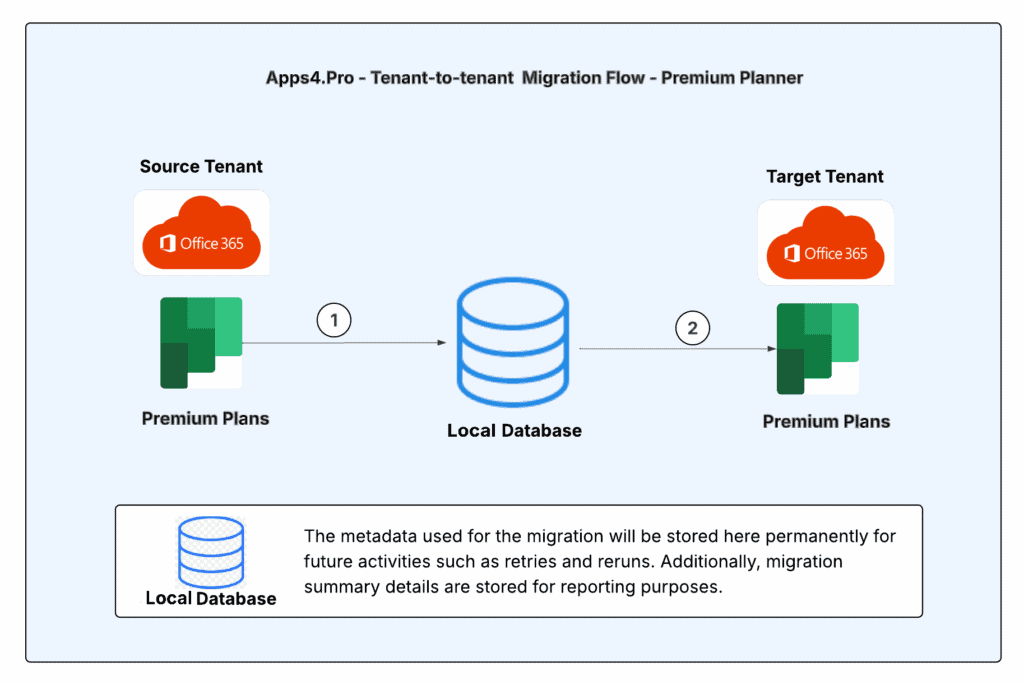
Architecture Diagram
Pre-Migration Setup for Premium Planner Migration
Before migrating Premium Plans using Apps4.Pro Migration Manager, it is essential to understand the migration requirements for both the source and destination endpoints. Ensure that all the following requirements are met for a smooth migration process.
App Installation
Contact us at presales@apps4.pro to get the latest version of the Premium Planner Migration application download and installation process.
During the installation process, all necessary software required for the application (listed below) will be installed.
- Node.js 20.20.2 x64
- Microsoft EdgeWebView2 Runtime
- .NET Desktop Runtime 10.0.4 x64
- ASP.NET Core Runtime 10.0.4 x64
- Dotnet-sdk-10.0.203
Connect your Source & Target Environments
Source Connector Account – Sign-in
Establish a connection with the Source Connector Account by signing in through the Apps4.Pro Migration Manager app.
Steps to Connect:
- Go to the Setup tab in the Migration App.
- Under Source Connection, click on the Copy & Open button.
- Paste the copied code into the authentication window.
- Enter the Source Connector Account details to complete the connection.
Target Connector Account – Sign-in
Establish a connection with the Target Connector Account by signing in through the Apps4.Pro Migration Manager app.
Steps to Connect:
- Go to the Setup tab in the Migration App.
- Under Target Connection, click on the Copy & Open button.
- Paste the copied code into the authentication window.
- Enter the Target Connector Account details to complete the connection.
Note:
Apps4.Pro supports MFA and Modern Authentication and hence there is no need to disable security features.
Configure Planner Premium
Apart from the Source & Target – Connector Account configurations, we must configure ‘Planner Premium’ Connectors on the Source and Target.
If the Planner Premium configuration fails or is not connected, follow the steps listed in the Planner Premium Settings.
Application Tenant Data Refresh
Perform an Application Data Refresh before you start the Migration.
- Navigate to “Settings -> App Data”.
- Select the checkbox next to the below resources to perform a full sync of the app data resources for the following resources:
- Source Tenant Users
- Target Tenant Users
- Source Tenant Groups
- Target Tenant Groups
- Source Tenant Plan Premium
- Target Tenant Plan Premium
Note:
- Click on
 icon to download the source and target users, which can be used to frame the Tenant-level Users / Groups Mapping.
 - If the checkbox is unselected, it performs an incremental refresh from the last time it was refreshed. You could also find the time when the data was previously refreshed here.
- If the data is not loaded against Plan Premium, follow the steps listed in the Planner Premium Settings and retry.
Planner Premium Settings
If Planner Premium Connector is successfully configured and the data is successfully updated in App Data->Plan Premium, you can ignore the below Planner Premium Settings.
Follow the below steps to retrieve the Dataverse URL and update it in the Planner Premium settings.
- Open the URL https://admin.powerplatform.microsoft.com using both the source and target connector accounts and sign in.
- Navigate to Manage → Environments and choose the environment where Planner Premium is deployed.
- In the Environment Details section, locate the Environment URL, and copy the URL — it will follow a format like https://org111a22a1.crm.dynamics.com
- In the Apps4.Pro Migration Manager app, navigate to Settings → Other Settings → Planner Premium Settings and paste the copied Source and Target Dataverse URLs into their respective fields, then Save the settings.
Premium Planner Inventory Report
Note:
Add ‘Source Connector Account’ as a member of the Premium Plans before generating the Inventory Report.
- Navigate to “Settings -> App Data”.
- Select the checkbox next to the below resources to perform a full sync of the app data resources for the following resources:
- Source Tenant Plan Premium
- Target Tenant Plan Premium
- Click on icon to download the Source and Target Premium Plans in excel format.
Application User Mapping
The migration scoped users in the source and target tenants need to be mapped so the app can utilize this information to add membership during migration.
Steps to Perform User Mapping:
Navigate to the “Mapping” tab → USERS MAPPING. Here, you can add user mappings based on any of the options listed below.
Option 1 – Individual Manual Mapping: Manually add user mappings using the “Add” option.
Option 2 – Bulk Mapping through Auto Map: If user’s display name or UPN in the source and target tenants are the same, our tool provides an “Automap” feature to streamline the mapping process.
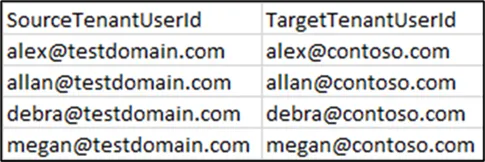
Option 3 – Upload bulk mappings through CSV: If the display names of the users in the source and target tenants are different, you can download the sample file, add the user mappings, and import them using the “Import CSV” option.
You can download the tenant-level users to frame the Mapping CSV, please refer to Application Tenant Data Refresh.
Sample CSV File
Important:
Using the “Clear All” option you can clear the previously added mappings in a single shot.
Once all the above preparatory steps are done, you are ready to create a Migration Job.
Note:
We recommend running a small Pilot Migration (perhaps one or two Premium Plans) before moving all Premium Plans, to validate your setup and measure throughput.
Start Microsoft Premium Planner Migration
Step 1 : Create Job
Step 1: Navigate to Migrate tab
Step 2: Enter a Job Name
Step 3: Select Source as “Premium Plans“.
Step 4: Select the Premium Plans to Migrate
- Option 1 : Select required Source Premium Plans to migrate manually from Tool.
- Option 2 : Upload bulk Premium Plans via CSV using ‘Select Premium Plans from CSV‘
- Click button to Download a sample CSV.
Sample CSV :
- Enter the Plan Names and IDs in the downloaded CSV file
- Click ‘Select Premium Plans from CSV’ button to upload the Premium Plans from CSV

Step 5: Choose the format of Planner Task Attachments. Formatting options include
- None – attachments are not migrated
- Copy URLs and SharePoint
- Copy URLs alone
Step 6: Click Next.
Step 2 : Target Settings
Group Settings
In this step, provide the target group(s) to migrate plans. The following options are available to select target groups.
- Migrate into the new group/team.
- Migrate data to the existing group/team. Here, you can choose to ‘Replace with Source Group Settings’.
Upon choosing ‘New Group’ or ‘Existing Group’ option, you can enable team for that group.
Migrate User : When migrating to an existing team / group, one can choose to migrate the additional members by enabling this option.
Plan Settings
Under Plan Settings tab,
- Select the required plans by clicking the checkbox.
- Choose to migrate into New or Existing Plan
- Select the format of the planner task attachments
Step 3 : Job Summary
In this step, you can view the summary of job. After checking the summary, you can select one of the following two options.
- Save Job -> It saves the current job, then you can run later by clicking Start button from Migration Jobs grid.
- Save & Migrate Job -> It saves the current job and starts the migration process immediately.
Step 4 : Execute Saved Jobs
Under Migration Jobs section – the Jobs and their summary are listed. You can opt to run the previously saved jobs by clicking the Start button under Action column.
Step 5 : How to resolve errors using ‘Retry’ Option ?
The Retry function helps resolve errors when a Job is completed with an error or warning.
Steps to Perform Retry:
- Navigate to Migrate tab → Migration Jobs.
- Identify the Jobs with a status of “Completed with Errors” or “Completed with Warnings.”
- Click ‘Retry’ under Action, to reattempt the migration.
Post Migration
End User Experience
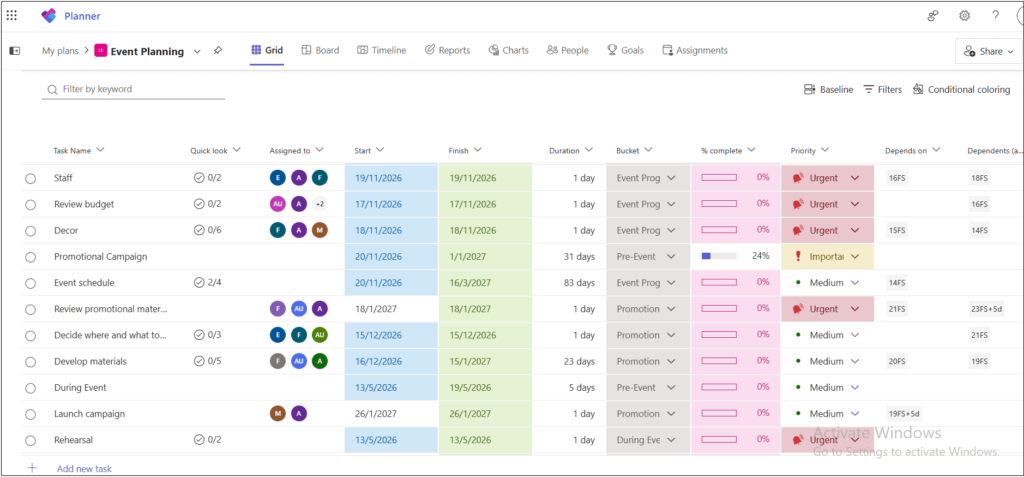
Premium Plan details
Source

Target
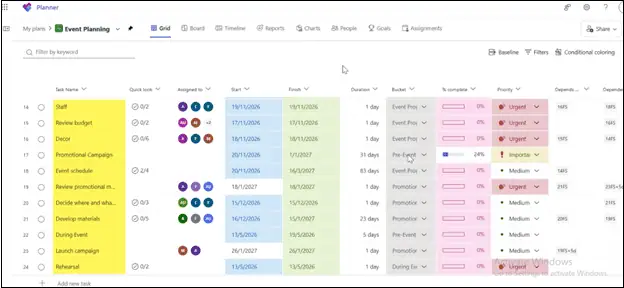
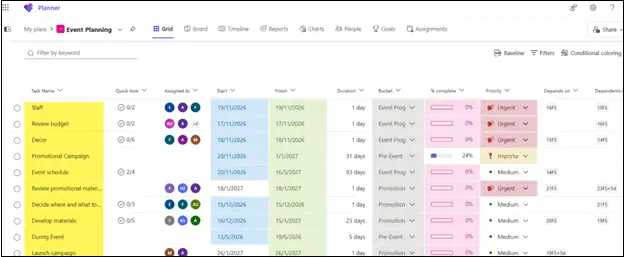
Tasks in Grid View
Source
Target
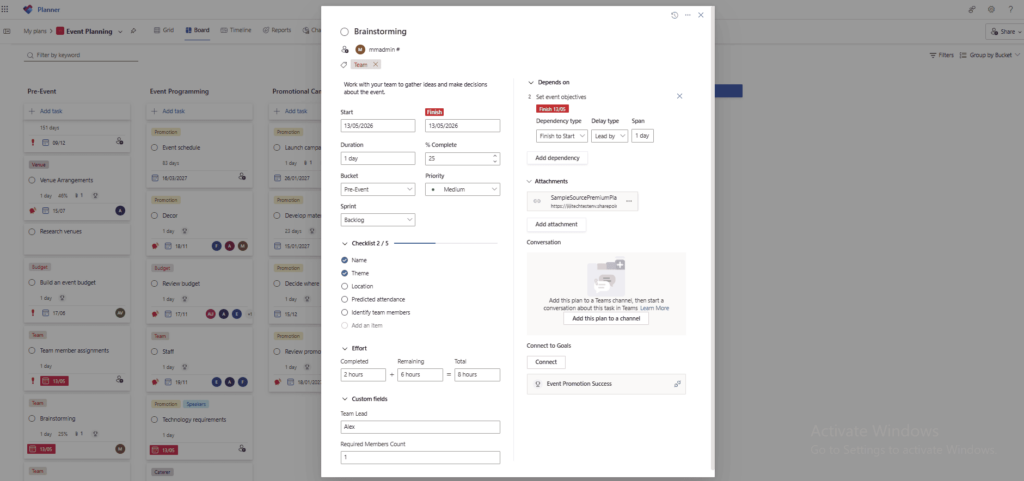
Task Details
Source
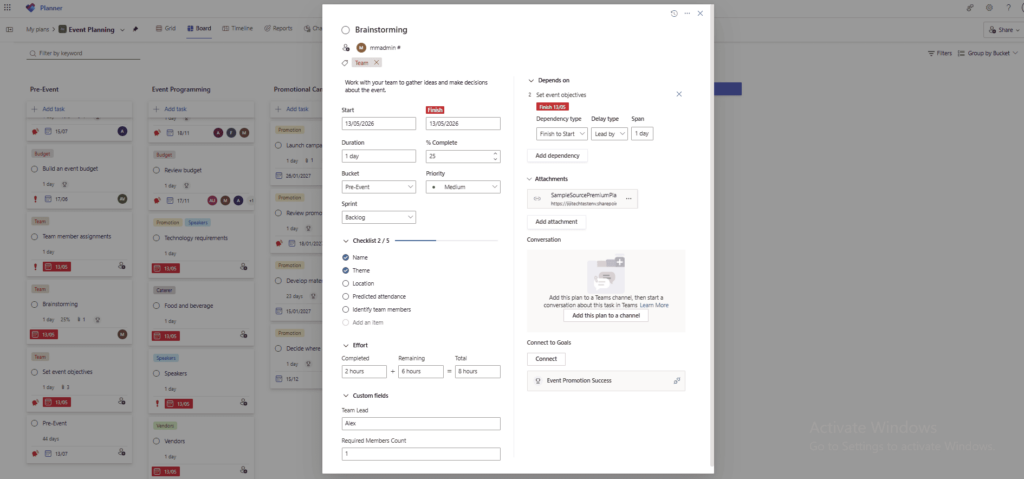
Target
Troubleshoot
If you require support or guidance on the errors, warnings or non-migrated items, get the logs, job results and mail them to support@jijitechnologies.com for further analysis.
To get the logs, go to the Settings tab -> Tracer Logs and download
- Export Logs
- Plans Logs
- On clicking “Plans Logs”, a popup appears.
- Select the problematic job(s)
- Click OK to export the Plans Logs.
To get the Job results,
- Navigate to Migrate tab→ Migration Jobs.
- Click
 button before the relevant job to download the Job results.
Conclusion
In summary, Apps4.Pro Migration Manager enables a reliable and seamless transfer of Microsoft Planner Premium data between Office 365 tenants. By following this guide, administrators can ensure data integrity, reduce downtime, and improve collaboration continuity. For questions, check our FAQ or reach out to support at support@jijitechnologies.com.
FAQs
-
- Valid Microsoft 365/Office 365 License with “Microsoft Planner” app enabled is required for Source & Target Connector Accounts.
- Valid Microsoft Planner Plan 3 or Microsoft Planner Plan 5 license is required for Source & Target Connector Accounts.
- System Administrator role in the Dataverse environment OR Global Administrator is required for both Source & Target Connector Accounts.
Note: These roles are required to ensure the service account has sufficient permissions to read, write, and manage project data stored in the Dataverse environment. - Source Connector Account should be a Member of the Premium Plans that you choose to migrate.
No, a Premium license is not mandatory for all users. However, the Source and Target Service Accounts used for migration must have a valid Microsoft Planner Plan 3 or Plan 5 license assigned, and the users should be member of the Dataverse environment.
- Configure the Source and Target tenants.
- Configure the source and Target Premium Planner Connectors.
- Configure the Source and Target Dataverse URL in Settings → Other Settings → Planner Premium Settings.
- Perform a Full Sync for source and target tenant users, groups and premium plans from App Data.
- Create a Migration Job and select the required Premium plans for migration.
- Initiate the migration process.
- Verify the migrated data for accuracy after completion.
Yes, we can migrate the plans created in custom environment by entering the corresponding environment URL in Settings → Other Settings → Planner Premium Settings → Source Dataverse URL.
Yes, we can migrate the plans to any custom environment by entering the corresponding environment URL in Settings → Other Settings → Planner Premium Settings → Target Dataverse URL.
Yes, you can migrate multiple Premium Planner plans at once in Apps4.Pro Planner Migration using a job-based structure. This helps streamline the overall process by allowing you to group and migrate several plans in a single action, saving both time and effort.
The Retry function helps to resolve errors when a Job is completed with an error or warning.
Steps to Perform Retry:
- Navigate to Migrate tab → Migration Jobs.
- Identify the Jobs with a status of “Completed with Errors” or “Completed with Warnings.”
- Click ‘Retry’ under Action, to reattempt the migration.
Yes, Apps4.Pro Migration Manager migrates the task attachments into destination same way it was attached to the source. During the migration, by default attachments will be uploaded into the SharePoint site associated with that migrating plan and the attachment will be added to the respective Planner task. This default behavior is controlled during Job creation by an option “Copy URLs and SharePoint Files” under Attachments column in the Target Settings → Plan Settings.
Yes, Apps4.Pro Migration Manager migrates the dependency property of the task to the target.
Here is the glimpse of the Source & Target portraying the “dependency” property migration.
Source
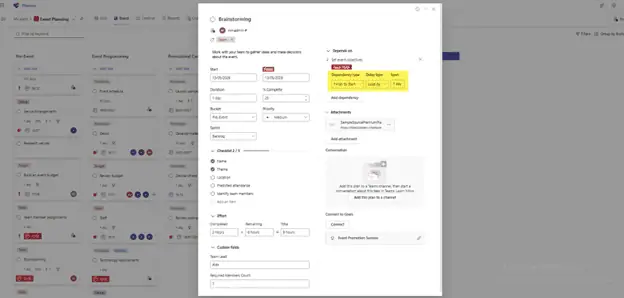
Target

Yes, Apps4.Pro Migration Manager preserves the order of the task to the target plan.
Here is the glimpse of the Source & Target portraying the order of the task in Source and Target tenants.
Source
Target
If the Microsoft 365 Group is not available in the target tenant, Apps4.Pro Migration Manager automatically creates a new Microsoft 365 Group and add mapped users in the target tenant, and the Premium Planner plan will be migrated to the newly created group.
If the Microsoft 365 Groups have already been migrated or are available in the target tenant, Apps4.Pro Migration Manager can migrate the Premium Planner plans to the existing groups.
 Manage


 Migrate

