

Microsoft Forms Tenant to Tenant Migration Guide
Introduction
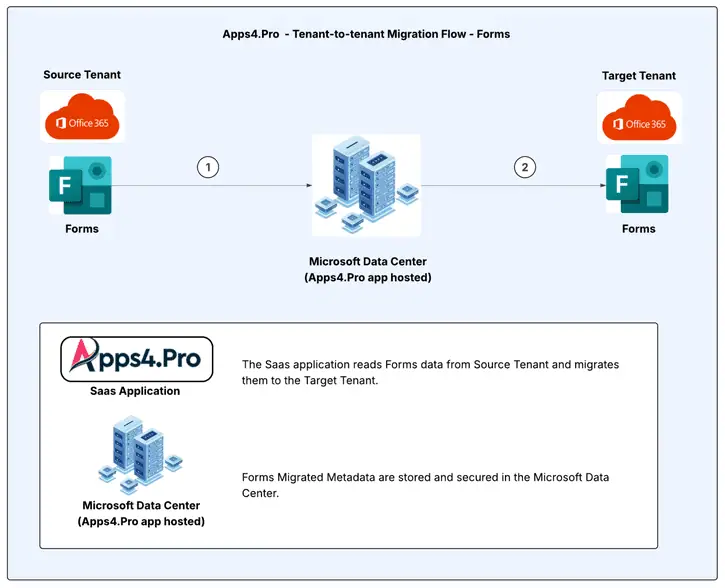
Apps4.Pro Forms Migration simplifies the migration of Forms and Quiz Forms for users and groups. This SaaS-based tool offers a free trial with an inventory report, helping users plan their migration effectively.
This guide provides step-by-step instructions for exporting forms inventory and completing the tenant to tenant Microsoft Forms migration process.
The inventory report includes details such as:
- Number of user and group forms
- Form names and owners
- Question and response counts
Before migrating, Microsoft Forms using Apps4.Pro Migration Manager, it is crucial to understand the requirements for both the source and destination endpoints. Make sure all the necessary prerequisites are met to ensure a smooth and successful migration process.
Scope of Microsoft Forms Migration
For more details on what gets migrated to the Target Tenant after the Microsoft Forms migration, refer to the below listed features.
Limitations
- Below limitations apply for Forms with Upload Type Questions only.
- Adding new collaborators to the Migrated Form will not be allowed.
- Creating upload type questions to the Migrated Form will not be allowed.
- Incremental Migration is not supported.
Apart from this, there are no limitations on the number of Forms, Quizzes, Collaborators, Response, Attachments that can be migrated at the tenant-level.
Roles & Licenses for Forms Migration
The following roles & licenses are required for both Source & Target Connector Accounts.
- License: Valid Microsoft 365/Office 365 License with “Microsoft Forms” app enabled.
- Role: Office Apps Administrator with admin consent that can be granted via a generated URL in the application.
- Additional permissions required :
- To migrate a Group Form, both Source & Target Connector Accounts must be a member of the Group the form belongs to.
- To migrate a User Form, Source & Target Users in Migration Scope need to have valid Microsoft 365/Office 365 License with “Microsoft Forms” app enabled.
Note:
Apps4.Pro supports MFA and Modern Authentication — no need to disable security features.
Architecture Diagram
Getting Started
1. Preparing for Microsoft Forms Migration
- Ensure the service account has the necessary roles and licenses.
- Set up user and group mapping for a smooth migration process.
2. Syncing Forms Data
- Retrieve details of all forms, including questions and response counts, by syncing data from the source environment.
3. Generating Inventory & Planning Migration
- Extract an inventory report to analyze the number of forms and plan the Forms migration process.
4. Performing Migration
- Select required forms and initiate the migration.
Pre-Migration Setup for Forms Migration
Signup & Setup Process
- Contact us at presales@apps4.pro for the tool link and load it on the web browser.
- Click Login and key in with Source Service Account details.
Required Permissions:
| Permission | Justification |
| View your basic profile | Allows the app to see your basic profile (e.g., name, picture, user name, email address) Allows the app to see your basic profile (e.g., name, picture, user name, email address) |
| Maintain access to data you have given it access to | Allows the app to see and update the data you gave it access to, even when you are not currently using the app. This does not give the app any additional permissions. |
Source & Target Connection Setup
- Source Connection
- Navigate to the Tenants tab, then click ‘Add Tenant’ to configure source.
- Sign-in using the Source Service Account.
- Once sign-in completed, the permissions are listed.
- Admin Consent for Source Service Account
Click Configure button next to the below permissions to give consent for Source Service Account.
- Core.Basic
- Forms.Basic
Option 1: Grant Consent using the Consent URL (If the Service Account is a normal user with minimum privileges)
- Click on option ‘Copy Admin Consent Url’ to copy the admin consent URL to your clipboard.
- Share the copied URL with the Global Administrator of the Source Tenant, and request them to follow the steps below:
- Open the consent URL in a web browser.
- Sign in using a Global Administrator Account.
- Select the checkbox “Consent on behalf of your organization.” and Accept.
Option 2: Grant Consent from the tool (If the Service Account is a Global Administrator)
If the Service Account is a Global Administrator, you can directly grant consent from the tool by following these steps:
- Click the “Grant Consent” button.
- Sign in using the Global Administrator Account.
- Review the requested permissions.
- Click Accept to grant the required delegated permissions.
- Target Connection
- Click
 icon on the top center to configure Target Account.
 - Sign-in using the Target Service Account.
- Once sign-in completed, the permissions are listed.
- Admin Consent for Target Service Account
- Click Configure button next to the below permissions to give consent for Target Service Account and complete consent process same as Source Account.
- Core.Basic
- Forms.High
Sync Users & Groups
To facilitate the migration of form collaborators and permissions from the source tenant to the target tenant, it is necessary to map users and Office365 groups accordingly.
Sync Users
Follow the below steps to Sync both the Source, Target Tenant-level Users.
- Hover over the Overview tab and click on Users from the listed apps.
- Select the Source tenant from the dropdown menu.
- Initiate the Sync option to sync all users from the Source Tenant.
- Similarly select the Target tenant from the dropdown menu, then initiate the Sync option to sync all users from the target tenant.
Sync Groups
Follow the below steps to Sync both the Source, Target Tenant-level Groups.
- Hover over the Overview tab and click on Groups from the listed apps.
- Select the Source tenant from the dropdown menu.
- Initiate the Sync option to import all groups from the Source Tenant.
- Similarly select the Target tenant from the dropdown menu, then initiate the Sync option to populate all groups from the target tenant.
Sync Forms
Upon completion of user and group synchronization, sync all the latest Forms at the Tenant-level.
- Proceed to Overview tab >> Click Forms
- Choose the Source Service Account from the drop down at the top center listing the accounts.
- Select “Sync Forms” option which retrieves all user and group forms from the selected account.
Choose between the below options:
- Sync All forms: From the dropdown menu, select “Sync All forms “ to retrieve all the forms available in the source tenant.
- Sync Group forms only: Select “Sync Group Forms Only” if you intend to exclusively migrate group forms only.
- Sync User forms only: Select ” Sync User Forms Only” if you intend to exclusively migrate user forms only.
- Sync via Excel: Select “Upload excel to sync forms” if you intend to exclusively migrate the selected forms using an Excel file.
All these options list of forms with basic details such as Form name, Owner name, Form type – Group/Form.
Sync Form Details
Use “Sync forms details” option to update form details, including the number of questions and responses. This will provide additional information for each form. You can choose to retrieve all forms or a specific subset, such as forms created by certain users or linked to specific groups.
Options:
- Sync All Forms Details – Syncs all forms.
- Sync Selected Forms Details only – Syncs manually chosen forms.
- Sync forms details via Excel – Syncs details of Forms imported from an Excel file.
Forms Inventory Report
The Export feature allows you to generate an inventory report in Excel format from the Source Tenant.
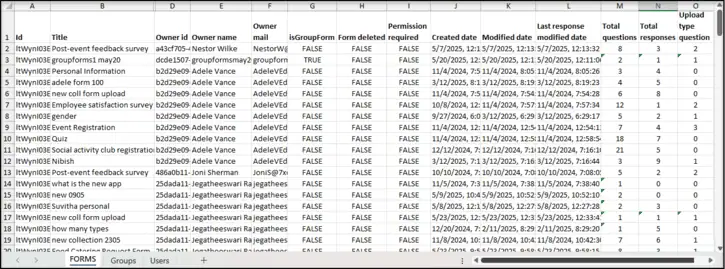
Hover over the Overview Tab -> Click Forms -> All forms -> Click Export to generate an Excel report, which includes:
- All User Forms
- All Group Forms
- Form level Details
- Created Date
- Modified Date
- Last Response Modified Date
- Total # of questions
- Total # of responses
- Total # of upload-type questions
Sample Inventory Report
List of Tenant-level Forms
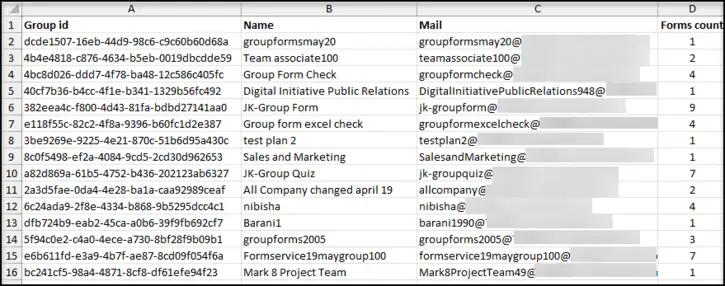
List of Tenant-level Groups
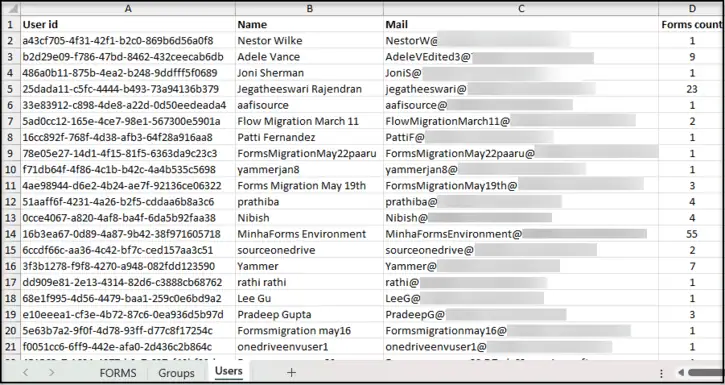
List of Tenant-level Users
Project Setup
A project refers to the accounts that need to be used as the source and target accounts to proceed with the migration.
- Navigate to the Projects tab, then click on Add Project to create the project.
- In the project creation window, provide the project name and description, select your Source and Target Tenants, and then click Next.
- In the Assets section, click on Forms Workload and then click Next to continue.
- In the Consent section, consents granted by the Global Admin are listed.
You have options to Edit or Configure the consent from here too.
- Review the details and click Create to create the project.
Mapping
To facilitate the migration of form collaborators and permissions from the source tenant to the target tenant, it is necessary to map users and Office365 groups accordingly.
The app is designed to automatically map source users to their corresponding target users during the migration process. To do so, navigate to the “Projects” and select the required project.
1. Users Mapping
- Hover over Projects >> Mappings. Click ‘Users’ from the listed menu.
- Below options can be used to do the mapping.
Auto Map: Match users automatically if their display names are the same in both the source and target tenants.
Import CSV: Use a CSV file to update user mappings in bulk.
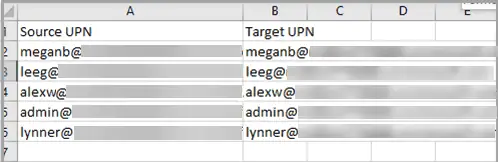
CSV Format for User Mapping:
| Source UPN | Target UPN |
| user1@source.com | user1@target.com |
2. Groups Mapping
- Hover over Projects >> Mappings. Click ‘Groups’ from the listed menu.
- Below options can be used to do the mapping.
Auto Map: Match groups automatically if their display names are the same in both the source and target tenants.
Import CSV: Use a CSV file to update group mappings in bulk.
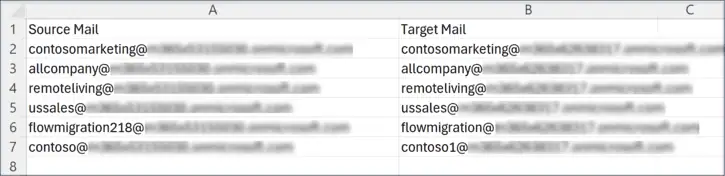
CSV Format for Group Mapping:
| Source Mail | Target Mail |
| group1@source.com | group1@target.com |
Edit Mapping: You can modify the target mapping using the Edit icon ![]() to update the target user/group after mapping.
to update the target user/group after mapping.
Delete Mapping: If you need to remove a target user/group mapped, use the Delete icon ![]() to delete the mapping.
to delete the mapping.
Once all the above preparatory steps are done, you are ready to create a Migration Task.
Note:
We recommend running a small pilot migration before moving all Tenant-level Forms, to validate your setup and measure throughput.
Start Forms Migration
Overview of User & Group Form Migration
1. User Forms Migration
1. Without Upload-Type Questions:
- Migrated as-is; responses are stored in the owner’s OneDrive.
- Collaborators and sharing settings are also transferred to the new account.
2. With Upload-Type Questions:
- A new M365 Group is created in Target named “Forms migration”. The files of the “Forms with upload-type questions” are moved to the SharePoint site of this newly created Group.
- Unique permissions are applied to maintain access.
2. Group Forms Migration
- Ensure the service account is a member of both source and target groups.
Once all the above preparatory steps are done, you are ready to create a Migration Task.
Migration Process
Step-by-Step Migration
Navigate to Overview >> Forms
Step 1: Sync Forms
Ensure the sync process as mentioned in the Step: Sync Forms has been completed.
Step 2: Sync Form Details
Ensure the Form Details Sync as mentioned in the Step: Sync Form Details process has been completed.
After syncing the details, you can view the forms listed under Ready to Migrate Tab.
Step 3: Select the Forms
Under Ready to Migrate Tab, select the Forms to migrate with any of the options stated below.
Option 1: Select Forms Manually
- Select the forms from the listed ones by clicking the checkbox beside them.
- Click Migrate Forms >> Migrate Selected Forms only to migrate manually selected Forms only.
Option 2: Select Forms from Excel
- Download a sample excel from Migrate Forms >> Migrate Forms via Excel >> Download Sample Excel File
Sample Excel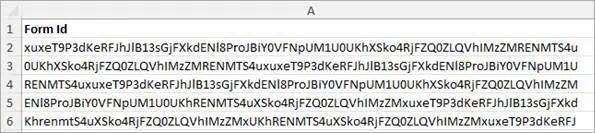
- Populate the excel with the IDs of the Forms to be migrated.
- Click Migrate Forms >> Migrate Forms via Excel >> Migrate Forms from Excel to upload the updated excel.
Step 4: Review validation details before proceeding
- “Selected Forms” dialog box will appear, showing information about the details of the selected forms for migration.
- Verify the details of the Forms
- Click Proceed
Step 5: Select the related project and then click Next to continue.
Step 6: Review the User Mappings
User mappings of the Project are listed, where you can review and update the existing mappings as applicable with the options – AutoMap, Export CSV, Edit / Delete Mapping. Please refer Users Mapping for more information.
Click Next to proceed.
Step 7: Review the Group Mappings
Group mappings of the Project are listed, where you can review and update the existing mappings as applicable with the options – AutoMap, Export CSV, Edit / Delete Mapping. Please refer Groups Mapping for more information.
Click Next to proceed.
Step 8: Review the Final Summary
- Review the Final Summary displayed
In case a User do not map to a Target User, you can ignore the Warning by checking the checkbox “Skip warning & proceed” - Click ‘Migrate’.
Only forms marked Suitable for migration will be migrated.
The system will now generate tasks for each form and process migration. You can monitor the progress and review the migration status inside the related Project.
Task Status
Navigate to Projects tab >> Select the related Project. In the Apps tab, you can monitor the progress and migration status.
- Task in Queue: After creation, the task enters the queue, awaiting processing.
- Task in Pause: The task can be paused if needed, temporarily stopping the migration.
- Task Completed: Once migration is successfully finished, the task moves to the Completed section.
Note:
You can review details of specific migrated items using the “View Details” option in the task.
How to Retry a Task?
The Retry function helps resolve errors when a task is completed with an error or warning.
Steps to Retry a Task:
- Navigate to Projects tab >> Select the related Project.
- In the Apps tab, move to Completed tab.
- Identify tasks with a status of “Completed with Errors” or “Completed with Warning”
- Select the task you want to retry.
- Click ‘
 Retry’ to reattempt the migration.
Post Migration
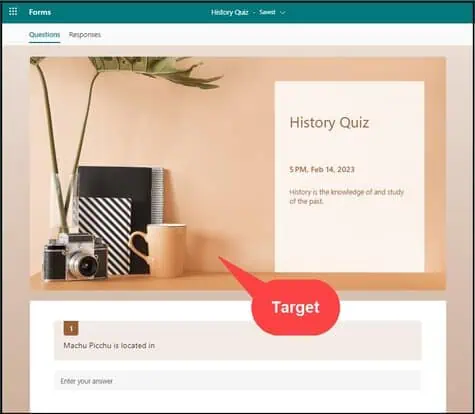
End User Experience
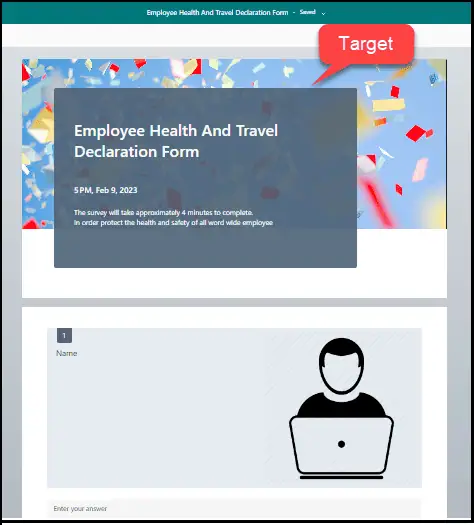
Forms Migration
Source
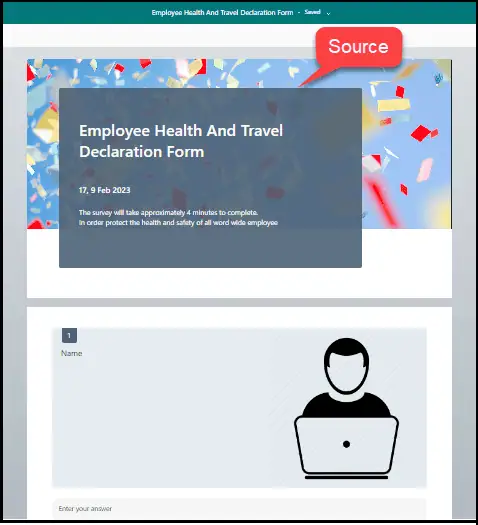

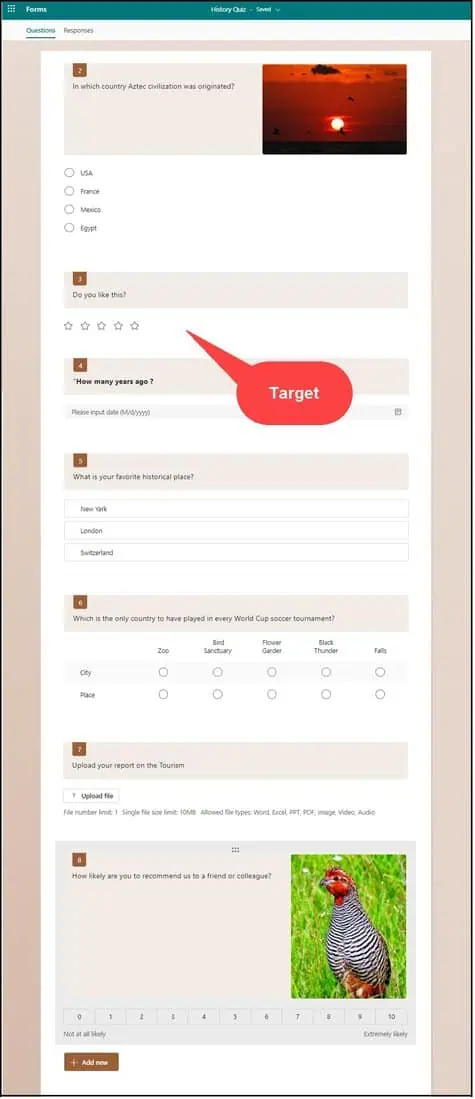
Target
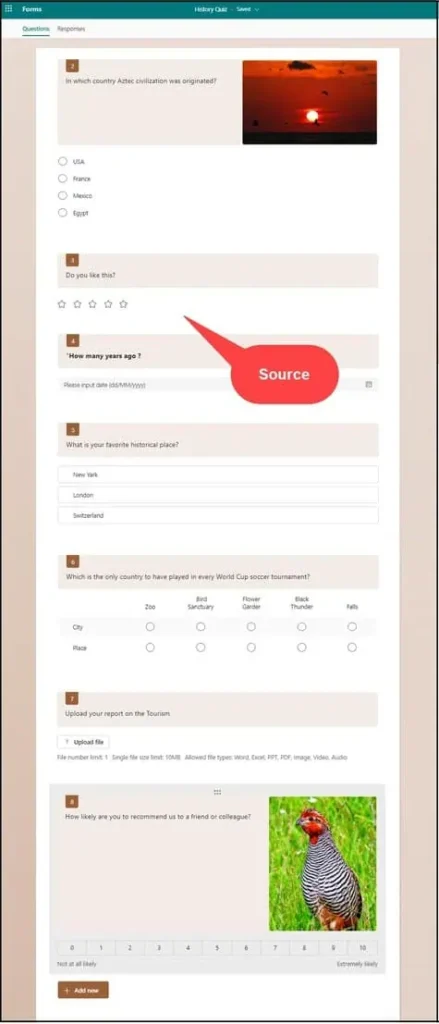
Quiz Migration
Source

Target
Conclusion
In summary, Apps4.Pro Migration Manager for Microsoft Forms provides a secure and efficient solution for transferring forms, responses, and settings without data loss. By adhering to the outlined steps, you can seamlessly migrate Forms content between Office 365 tenants. For further assistance or inquiries, please consult our FAQ or reach out to our support team at support@jijitechnologies.com.
FAQs
The following roles & licenses are required for both Source & Target Connector Accounts, for Microsoft Forms tenant to tenant migration
-
- License: Valid Microsoft 365 Office 365 License with “Microsoft Forms” app enabled.
-
- Role: Office Apps Administrator with admin consent that can be granted via a generated URL in the application)
-
- Additional permissions required :
-
- To migrate a Group Form, both Source & Target Connector Accounts must be a member of the Group the form belongs to.
-
- To migrate a User Form, Source & Target Users in Migration Scope need to have valid Microsoft 365 Office 365 License with “Microsoft Forms” app enabled.
-
- Additional permissions required :
Yes, we do have a 15 days free trial offered for Microsoft Forms Migration and Apps4.Pro offers Forms Migration as a Saas Product.
Part of the free trial, you get to download an Inventory Report of the tenant-level data that provides the below information.
- Forms Id
- Title
- Description
- Owner Id
- Owner Name
- Owner Mail
- Is Group Form
To check how it works for your tenant, contact Sales : presales@apps4.pro
For further details, please visit Microsoft 365 Forms Migration tool | Apps4.Pro.
- Set up access to Source and Target tenants.
- Sync forms and associated data from the Source.
- Choose the forms for migration.
- Transfer forms and responses.
- Ensure forms, responses, and settings are migrated correctly.
- The reason for migrating User Form as Group Form in the Target environment, is primarily due to Microsoft’s policy, which imposes a limit of 400 forms creation per user.
- Due to this constraint and to avoid the need of end user intervention during the migration, the Forms are created by the Target Service Account.
- Please be noted that this approach will not make any difference in the End User’s Interface.
It is necessary for both the Source and Target Service Accounts to have Secondary Admin Access, in order to migrate the attachment files of the User Forms, from the Source tenant to Target tenant OneDrive accounts.
To generate an Inventory Report,
- Navigate to the “Forms” tab. Upon hovering over the “Export” option, a dropdown menu will appear.
- Select “Export forms” from this dropdown menu. This will initiate the process of creating your inventory report as an Excel file. It includes Form Title, Form Owner and Form Type (Group Form / User Form) indicated as a Flag.
Sample Inventory Report
Forms at Source Tenant
Groups at Source Tenant
Users at Source Tenant
Navigate to Forms -> Migration Summary tab. Here you can view and export the Migrated Forms details to an Excel file.
The exported data will contain the below Source & Target details
- Form Name
- Form ID
- Form Owner
- Form Type
- No. of questions
- Form link
- Response URL
The responses will be migrated as-is to the Target and you can witness the responses and their summaries right from the Forms app. But the responses are posted by the Service Account due to API limitations.
Yes, Bulk Forms Migration using CSV is possible. Follow the below steps.
- Navigate to Forms -> SOURCE.
- Click on Migrate -> Migrate from Excel selected forms
- Upload the excel containing forms to be migrated
In Apps4.Pro Migration Manager, to import / export bulk Users or Groups, navigate to Mapping -> USERS / GROUPS. There, you have the options “Import CSV” and “Export CSV”.
Bulk Users – Sample CSV
Bulk Groups – Sample CSV
To find the number of Forms in the Source Tenant, follow the below steps.
Step 1 : Navigate to the “Mapping” section. Complete synchronization of Users & Groups by clicking ‘Sync’ option in both Users & Groups tabs.
Step 2 : Navigate to the Forms section. Then, hover over the “Get latest” option.
Step 3 : Select “All forms” option from the dropdown menu to fetch all the available forms from the Source Tenant.
At the bottom section of your screen, you will find the page count alongside the item numbers, this indicates the total number of forms in your source tenant.
You can also generate an Inventory Report by exporting it.
Yes, you can skip the User & Group Collaborators while migrating a Form. We can skip by de-selecting them in the “Mapping Details” section and proceed with the migration.
De-select the User Collaborators to be skipped by un-checking the checkbox under Mapping column.
To view the progress of the migration, navigate to the “Tasks” section. Here you can find the progress & Migration Status of the Ongoing Tasks as well as the Completed ones in tabs such as QUEUE, IN PROGRESS, PAUSE and COMPLETED.
View Details: You can check the detailed summary of the completed tasks using this option under the Status column.
 Migrate
 Manage


 Migrate
