

Microsoft Power Automate Tenant to Tenant Migration Guide
Introduction
Apps4.Pro Migration Manager facilitates the migration of Power Automate flows at the user level. It is easy to access since it is available as a SaaS tool. This guide offers a detailed, step-by-step process for migrating Microsoft Power Automate flows from one tenant to another. It also includes access to a Power Automate flow inventory report during the free trial period.
It covers the migration of Power Automate (Flow) content— including sharing flows with users, sharing flows with groups, archiving flows, and enabling or disabling flow statuses in the target tenant.
Overall, the guide is quite detailed and covers the end-to-end process (prerequisites, inventory, setup, mapping, migration, and verification).
Scope of Power Automate Migration
The migrated and non-migrated items for Microsoft Power Automate (Flow) migration to a new tenant are listed below.
Roles & Licenses for Power Automate Migration
The following licenses & roles are required for Source & Target Connector Accounts.
- License: Valid Microsoft 365/Office 365 License with “Power Automate” app enabled.
- Role: Power Platform Administrator role is required for Source & Target Connector Accounts with Admin Consent.
- To perform resource mapping, the following permissions must be granted:
| S. No | Resource Name | Permission |
| 1 | SharePoint | Site Admin |
| 2 | Team | Need to be a member |
| 3 | Group | Need to be a member |
| 4 | Plan | Need to be a member |
| 5 | User OneDrive | Secondary Admin |
| 6 | Exchange | Impersonation |
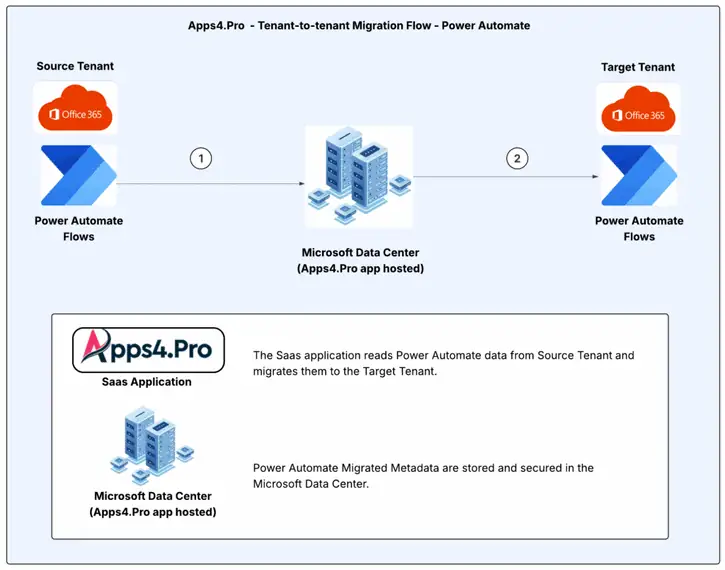
Architecture Diagram
Pre-Migration Setup for Power Automate Migration
Before migrating, Microsoft Power Automate flow using Apps4.Pro Migration Manager, it is essential to understand the migration requirements for both the source and destination endpoints. Ensure that all the following requirements are met for a smooth migration process.
Admin Consent [Least Privileges]
Important:
This action must be completed for both the Source and Target Tenants before establishing the connections.
If your Source / Target Account is limited to a Power Platform Administrator role, Tenant consent can be granted by your admin just by clicking a link [Please contact us at presales@apps4.pro for the link]
- Ask the admin to open the below consent link in their browser and sign-in with the admin Account.
- Click “Accept” to provide consent
Signup Process
To start using Apps4.Pro Microsoft Power Automate (Flow) Migration Tool, follow these steps:
- Contact us at presales@apps4.pro for the tool link and load it on the web browser.
- Click on the LOGIN button for your initial login.
- Now sign in with the initial login Account on the Sign-in page and click Accept to proceed.
Required Permissions
| Permission | Justification |
| View your basic profile | Allows the app to see your basic profile (e.g., name, picture, user name, email address) |
| Maintain access to data you have given it access to | Allows the app to see and update the data you gave it access to, even when you are not currently using the app. This does not give the app any additional permissions. |
Add Source and Target Connections
- Navigate to the Accounts section
- Click the + New button to set up a connection.
- Select the apps (Users, Groups, Power Automate, and Power Automate Mappings), review the listed permissions.
- Click Consent to grant access.
- After completing sign-in with Source Connector Account, you will see that the app is Connected
 , then click on Connect.
 - Now, you will see the Connector Account listed for the completed configuration.
- Similarly, follow the same steps to configure the Target Connector Account.
Note:
Apps4.Pro supports MFA and Modern Authentication and hence there is no need to disable security features.
Sync Source and Tenant Data
In order to read the Data from Source & Target Tenants, follow the below steps to Sync Users, Groups and Flows.
Choose the Source Connector Account from the accounts listed in the top center.
Sync Users
Follow the below steps to Sync Users from your Source Tenant
- Navigate to Overview tab
- Select Users in the top of the page
- Click on the “
 Sync” option
 - Once the Sync action is completed, all Users from Source Tenant are listed
Sync Groups
Follow the below steps to Sync all Groups from your Source Tenant
- Navigate to Overview tab
- Select Groups in the top of the page
- Click on the “ Sync” option
- Once the Sync action is completed, all Groups from Source Tenant are listed
Important:
Choose the Target Connector Account from the accounts listed in the top center and repeat Syncing Users & Groups.
Sync Power Automate Flows
After completing the synchronization of Users and Groups for Source Account, follow the below steps to get all Power Automate Flows.
- Navigate to Overview tab
- Select Power Automate → Flows
 in the top
 - Click on the “ Sync” option.
- Once the Sync action is completed, User Flows along with their Environments are listed.
Add Service Account to the Flows
For the migration process, the Source Service Account should have access to all User’s Flows. If the flow is not shared with the Source Service Account, you can use the following script to grant access.
Link to script File: script-to-share-flows-with-service-account.pdf
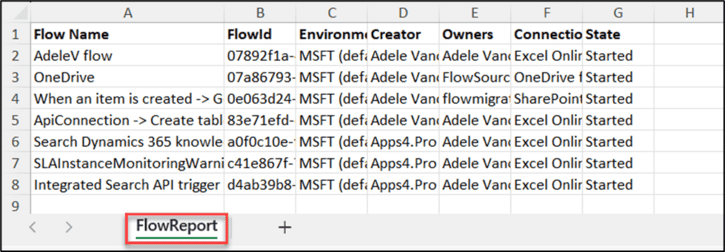
Export Inventory Report
![]() Export option allows you to export the Inventory Report of the User Flows as an Excel file.
Export option allows you to export the Inventory Report of the User Flows as an Excel file.
This inventory report includes below information excluding details of Flow Triggers and Actions.
- Number of users
- Flow names
- Flow owners
Sample Inventory Report
Project Setup
A project to be created to add the accounts to be used as the Source and Target accounts to proceed with the migration.
- Navigate to the Projects tab, then click on + Add Project to create the project.
- In the project creation pop-up, enter the name of the project
- Enable Power Automate
- Choose the Source and Target accounts
- And click Create.
- You will see the created project listed.
Mapping
In order to migrate the flows sharing permission from the Source to the Target Tenant, mapping is required for Users and Office 365 Groups.
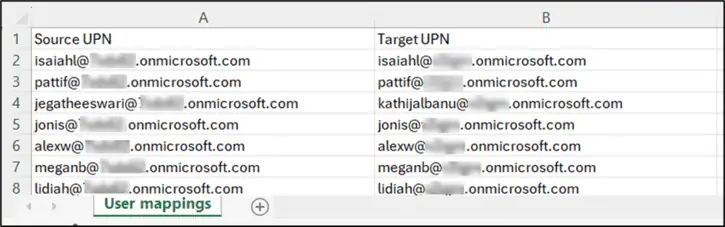
1. Users Mapping
Follow the below steps to create User Mappings
- Select the Project that was created
- Navigate to Mappings tab, and select Users in the top of the page
- Click on the option “ Sync” to sync all users from your Source and Target Tenant.
- You can make use of the options below to perform the user mapping.
Auto Map: This option allows for automatic user mapping based on the display name when it is identical in both the Source and Target Tenant.
Import CSV: For bulk updates, you have the option to export and import user mapping using a CSV file.
Sample CSV:
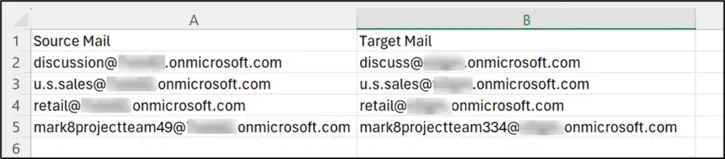
2. Groups Mapping
Follow the below steps to create Group Mappings
- Select Groups in the top of the page
- Click on the “ Sync” option to sync all groups from your Source and Target Tenant.
- To establish group mapping, you can employ identical options used for user mapping – Auto Map, Import CSV.
Sample CSV:
Recommended:
We recommend running a small Pilot Migration (perhaps one or two flows) before moving all Power Automate flows to validate your setup and measure throughput.
Start Power Automate Migration
Step 1: Sync Flow Details
- Click on
 icon on the Top Left Corner – you will land on the Overview Tab.
 - Make sure Power Automate → Flows is selected in the dropdown in the Top.
- Select the flows you wish to migrate.
- Click “ Sync Details” to retrieve the details of the flows, such as
- Connections
- Creator
- Owners
Step 2: Add flows to Project
- Select the flows you wish to migrate.
- Click on the
 Add To Project option.
 - A validation details dialog box will appear shortly, allowing you to review information regarding the flow’s suitability for migration, indicating whether it is valid or invalid.
- Click Proceed.
Step 3: Choose Project
Select the project you have already created or click on “Add New” to create a new Project. Then click “+ Add To Project“.
Now you are taken to the Project view for further process.
Step 4: Configure the Mappings
You can configure the below listed mappings at
- Flow-level by selecting each flow (OR)
- Project-level(which applies to all flows within the project) from the “Flow Mappings” tab.
1. Environments, Users & Creators Mapping
Set the mappings for the Target Environments, Users, Creators using any of the following options.
Option 1 – Auto Map: This option allows for automatic mapping based on the display name when it is identical in both the Source and Target Tenant.
Option 2 – Import CSV: For bulk updates, you have the option to export and import mapping using a CSV file. Use Export CSV option to download a sample CSV.
Option 3 – Individual Mapping: Use Edit Icon ![]() to add mapping one by one.
to add mapping one by one.
2. Supported and Unsupported Resources Mapping
Set the Target Value for Supported and Unsupported Resources using any of the following options.
- Option 1 –
 Set source value : Sets the Target value same as that of Source
 - Option 2 –
 Pick a resource : Pick from the listed Users / Groups based on the resource.
Click Initiate Migrate to initiate the migration of the chosen mapped flows.
Step 5: Get User Link
The flows have been reviewed, but the connection is not yet configured. To fix the connection, you need to login to the User Portal with the Corresponding Target creator.
- In the Overview tab, click the three-dot menu
 and select User Link.
 - Share the copied User Link with all end users(Target Creators).
Step 6: End User Migration
Step 1: Access the User Link and Login
- Open the User Link in a new InPrivate window
- Click LOGIN and log in as the target end user.
- Click “Proceed” to add Flow Scopes.
Step 2: Refresh the Flow List
- Click the Refresh Button
 to load the list of available flows.
 - Select a flow and click Fix Connection.
Step 3: Add a New Connection
Note:
This step is OPTIONAL and is required only if a connection does not exist.
- Click on the “ Sync” option to sync all existing Target connections.
- Under Target Connections column, Click + Add New to Create a new connection and map it.
Step 4: Fix All Connections
- After adding the necessary connections, ensure all target connections are mapped.
- Click “Fix All Connection” and click “FIX” in the ‘Fix All Connections’ popup window.
Step 5: Fix Connections in Power Automate
- You will be redirected to the Power Automate Flow Portal’s Connections page.
- Resolve the Connections individually from this page.
Step 6: Return to the Migration Manager
- After fixing the connections, go back to the Apps4.Pro Migration Manager Portal.
- Click Yes in the ‘Fix All Connections’ popup window to confirm.
Step 7: Verify Connections
- Double-check that all connections have been successfully created.
- Click Close to exit.
Step 8: Migrate the Flows
- Select the flows you want to migrate and click Restore.
- The flows will be successfully migrated.
This concludes the migration process.
Troubleshoot
If you require support or guidance on the errors, warnings or non-migrated items, reach our Support Team at support@jijitechnologies.com for further analysis.
Conclusion
In Summary, Apps4.Pro Migration Manager streamlines and secures the migration of Power Automate (formerly Microsoft Flow) between Office 365 tenants, ensuring a seamless process without data loss. By following the outlined steps, you can confidently transfer your Power Automate flows and connections. For additional assistance or inquiries, please visit our FAQ or contact our support team at support@jijitechnologies.com.
 Manage


 Migrate

