

Microsoft OneDrive for Business Tenant to Tenant Migration Guide
Introduction
The Apps4.Pro Migration Manager is a desktop application designed to seamlessly migrate documents and files along with their permissions from one OneDrive account to another.
This guide for OneDrive for Business to OneDrive for Business Migration includes files, documents, permissions, version history, and metadata. To ensure smooth and efficient migration, it is essential to complete all prerequisites in advance.
Follow the outlined steps to ensure a seamless and successful OneDrive data migration.
Scope of Microsoft OneDrive Migration
Listed below “what gets migrated” to the target tenant and “what’s not migrated” after the Office 365 OneDrive migration.
Limitations
- Version Limitation: If a document has over 200 versions, older versions will not migrate.
- Large File Versions: Versions of large-sized files (more than 700 MB) cannot be transferred.
- Duplicate Files/Folders: Files or folders already present in the target location will not be migrated again from the source OneDrive account.
Roles & Licenses for OneDrive Migration
The following licenses & roles are required for Source & Target Connector Accounts,
- License : Valid Microsoft 365/Office 365 License with OneDrive app enabled.
- Role: Both the Source and Target Connector Accounts can be a Normal User and need Admin consent for Delegated Permissions.
- Additional Access required :
- The Source Connector Account must have secondary site collection admin access to all the scoped source users.
- The Target Connector Account must have secondary site collection admin access to all the scoped target users.
Note:
- These roles ensure that the account can access all user’s OneDrive accounts and the license ensures that each OneDrive is active and available for migration.
- Admin Consent for Delegated Permissions are required for Apps4.Pro to securely access and migrate data across Microsoft 365 workloads. These permissions facilitate authentication and authorization, ensuring a smooth migration while maintaining data integrity.
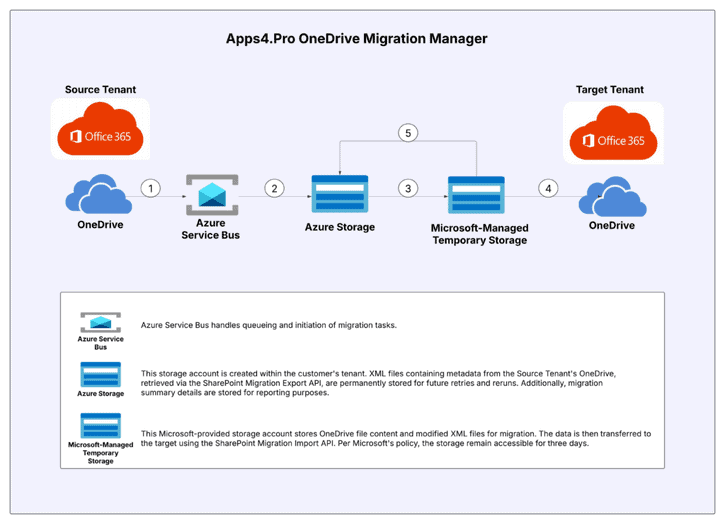
Architecture Diagram
OneDrive Inventory Report
Follow the below steps to export the Inventory Report of “Source Tenant Users’ OneDrive storage” for better cross tenant OneDrive migration planning.
Step 1 : Open Windows PowerShell ISE as ‘Run as administrator’
Step 2 : Install “Microsoft.Online.SharePoint.PowerShell” module using the cmdlet given below if it is not installed already or install using the .exe
Install-Module Microsoft.Online.SharePoint.PowerShell
SharePoint Powershell Module Exe : https://www.microsoft.com/en-in/download/details.aspx?id=35588
Step 3 : Download and open the attached script from PowerShell
Script File Link : GetUsersOneDriveStorage.ps1
Step 4 : Update the $AdminCenterURL variable with your “source tenant’s SharePoint admin URL” and the $CSVpath variable with the “local file path to export the storage details” in the script.
Step 5 : Execute the script, and once it runs successfully, you will find the output CSV file saved in the location specified in the $CSVpath variable in the script.
Note:
Ensure the script is run by an account with SharePoint Admin or Global Admin privileges.
Sample Output file : OneDriveStorageSizeReport.csv
Pre-Migration Setup for OneDrive Migration
Before starting the document migration process, ensure the following requirements are met:
1. Setup Secondary Admin Access
To ensure a successful document migration, the Source and Target Service Accounts must be assigned as Secondary Admins for the migration-scoped users. Please repeat the below steps to configure Secondary Admin Access for Source and Target Service Accounts.
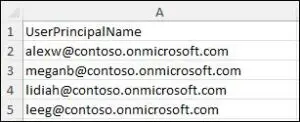
Step 1: Download the SampleUserMapping CSV file and the script.
Sample User Mapping CSV : SampleUserMapping.csv
Script : Onedrive-Secondaryadminscript.ps1
Step 2: In the SampleUserMapping file, update the scoped Source or Target users’ UPNs under the UserPrincipalName column.
Note:
Ensure the SampleUserMapping file is in CSV format.
Step 3: Open Windows PowerShell ISE as “Run as administrator”.
Step 4: Open PowerShell script file downloaded in “Step 1”.
Step 5: Replace the parameter values
- For the parameter “AdminURL”, input your Source or Target tenant’s SharePoint Admin URL.
- For the parameter “ImportPath”, input the path with the updated SampleUserMapping CSV.
- For the parameter “SecondaryadminUPN”, input the UPN of your Source or Target Service Account.
Step 6 : Run ![]() the script.
the script.
Step 7 : Login with Global Administrator / SharePoint Administrator credentials.
Now the Service Account gets added as Secondary admin to the users added in the CSV file.
2. Configure Azure AD Application
Method 1: Using Default Apps4.Pro Azure AD Application
Apps4.Pro registers its own Azure AD application during the application configuration. Since migration uses Service Accounts with minimal privileges(standard user Accounts without any assigned roles), Admin must provide Admin Consent & Delegate Permission which is explained later in this document.
When you consent to OneDrive Migration Workloads using the consent URL, the “Apps4.Pro” application is registered with the required scopes added as delegated permissions.
APIs Involved in OneDrive Migration:
- Graph API
- OneDrive Migration API
Method 2: Using Custom Azure AD application created in your Tenant
If you prefer to use your own Azure AD application instead of the default Apps4.Pro Azure AD application, you must create a single Azure AD application in the Source Tenant. This application should be configured with the required permissions for OneDrive migration.
Steps to Create Azure AD Application for Delegated Permission
Step 1: Sign in to Azure Portal
Go to: https://portal.azure.com and sign in with your credentials.
Step 2: Register a New Application
- In the search bar, type “App registrations” and select it.
- Click on “+ New registration.”
- Fill in the following details:
- Name: e.g., Apps4.Pro Migration Manager
- Supported Account types: Select “Accounts in any organizational directory (Any Microsoft Entra ID Tenant – MultiTenant)”
- Click “Register”
✅ Note Once registration is complete, your Azure AD application is ready for use. - Navigate to the Overview tab and copy the Application (client) ID. Save this value in a text editor — you’ll need it later during the Apps4.pro configuration.
Step 3: Configure Redirect URIs
- Under the Manage section, click Authentication.
- Click “+ Add a platform”, then select “Mobile and desktop applications.”
- Check the box for this URI:
https://login.microsoftonline.com/common/oauth2/nativeclient - In the Custom redirect URIs field, enter the following URIs: https://apps4.pro/thanks-for-consent
- Click “Configure”
- ✅ Ensure all redirect URIs are saved and listed correctly.
Step 4: Configure Public Client Flows
- Under the Manage section, click Authentication.
- Scroll down to the bottom. Under “Allow public client flows”, Set Yes to “Allow public client flows”. Click on “Save”
3. Get Azure Service Bus and Azure Table Storage Connection Strings
Creating an Azure Storage Connection and Azure Service Bus is a crucial step for a seamless OneDrive migration.
Apps4.Pro utilizes Azure Table Storage for storing user mappings, group mappings, task details, and user drive information. Additionally, it leverages Azure Service Bus for managing queuing mechanisms to streamline the migration process efficiently.
3.1. Create Table Storage Account and Get Connection String
Step 1: Login to Azure Portal using the link below.
Recommended:
It can be either Source or Target tenant. But it should have an active Azure Subscription.
Step 2: Search for “Storage accounts” and Click on it
Step 3: Click on “+ Create” button
Step 4: Fill in the required details as mentioned below, and click “Review + create”
Subscription – Valid subscription that the logged in account has access
Resource group – New dedicated resource group for OneDrive migration
Storage account name – Any unique name
Region – Select Target tenant region
Performance – Standard (Default)
Redundancy – Locally – Redundant Storage (LRS)
Step 5: Click on Create and wait for few seconds for Deployment.
Step 6: Once deployment completed, Click on “Go to resource”
Step 7 : From the left side menu, scroll down and expand “Settings” dropdown. Click on “Resource sharing (CORS)”
Step 8: Configure below CORS Values for both “Blob Service” and “Table Service”
Blob Service:
Allowed Origins: http://localhost:5016
Allowed Methods: GET, HEAD, PUT
Allowed Headers: *
Exposed Headers: *
Max Age: 60 seconds
Table Service:
Allowed Origins: http://localhost:5016
Allowed Methods: GET, HEAD, PUT
Allowed Headers: *
Exposed Headers: *
Max Age: 60 seconds
Step 9: From the left side menu, scroll up and expand “Security + networking”. Click on “Access Keys”.
Copy the “Connection String” under “key1”. Copy and note this value in a notepad which is required to input in Apps4.Pro Migration Manager after installation.
3.2 Create Azure Service Bus and Get Connection String
Step 1: Search for “Service Bus” using the Search bar at top and Click on it
Step 2: Click on “+ Create” button
Step 3: Enter the below required details and click “Review + create”
Subscription – Valid subscription that the logged in account has access
Resource group – Select resource group name used for creating storage account for exchange migration
Namespace name – Any unique name
Region – Target tenant region
Pricing Tier – Basic
Step 4: Click “Create” and wait for few seconds for deployment
Step 5: Click “Go to resource”
Step 6: From the left side menu, expand “Settings” and Click “Shared access policies”
Step 7: Click “RootManageSharedAccessKey” and copy value of “Primary Connection String”
Copy and note this value in a notepad which is required to input in Apps4.Pro Migration Manager after installation.
4. App Installation
Contact us at presales@apps4.pro to get the latest version of the OneDrive Migration application download and installation process.
Note:
During the installation process, all necessary software required for the application (listed below) will be installed.
- Node.js 20.20.2 x64
- Microsoft EdgeWebView2 Runtime
- .NET Desktop Runtime 10.0.4 x64
- ASP.NET Core Runtime 10.0.4 x64
- Dotnet-sdk-10.0.203
5. Initial Login Configuration
- Open the “Apps4.Pro Exchange Migration Manager” using the desktop shortcut
- Click on the LOGIN button and Sign-in using the Source Service Account credentials.
- Click on Accept to proceed.
Required Permissions:
| Permission | Justification |
| View your basic profile | Allows the app to see your basic profile (e.g., name, picture, user name, email address) Allows the app to see your basic profile (e.g., name, picture, user name, email address) |
| Maintain access to data you have given it access to | Allows the app to see and update the data you gave it access to, even when you are not currently using the app. This does not give the app any additional permissions. |
6. Pre-requisite Configuration
- Once the initial log-in is done, the app will direct to the Prerequisites tab.
- Click the Open button to launch the OneDrive Configuration Tool and provide the required details as described below:
Step1: Storage Account Configuration
- Storage Account: Enter the connection string for Azure Table Storage in this field.
Step2: Service Bus Configuration
- Service Bus: Enter the connection string for Azure Service Bus in this field.
Step3: Azure AD Application Configuration
- By default, the Apps4.Pro tool uses its built-in Azure AD application for migration. If you prefer to use your own custom Azure AD application, replace the existing Client ID under “Application Registration” tab with the Client ID of your application, and click Save.
Step4: Admin Consent
Important:
When you plan to use Custom Azure AD application created in your Tenant, make sure that you have replaced the Client ID in the ‘Application Registration’ tab before copying the consent URL.
Option 1: Grant Consent using the Consent URL (If the Service Account is a normal user with minimum privileges)
- Under Admin Consent tab, click on option ‘Copy Admin Consent URL’ to copy the admin consent URL to your clipboard.
- Share the copied URL with the Global Administrator of both the Source and Target Tenants, and request them to follow the steps below:
- Open the consent URL in a web browser.
- Sign in using a Global Administrator Account.
- Select the checkbox “Consent on behalf of your organization.”
Requested Delegated Permissions for Source Tenant
| Permission | Justification |
| Sites.FullControl.All | Used to authenticate the Source Tenant site for migration activities, including exporting OneDrive data using the Migration API. |
| User.Read.All | Used to retrieve details of all users from the Source Tenant, which are utilized for mapping user permissions on OneDrive files and folders. |
| Group.Read.All | Used to retrieve details of all types of groups from the Source Tenant, which were then used to map the group permissions for OneDrive files and folders. |
| Profile | This scope allows the app to retrieve basic user profile information from the Source connector Account. |
| Offline_access | This scope grants long-lived access by allowing the app to obtain a refresh token, enabling it to request a new access token without requiring the Source connector user to sign in again. |
| Openid | It allows the application to authenticate the Source connector and obtain an ID token containing claims about the authenticated Source connector. |
Requested Delegated Permissions for Target Tenant
| Permission | Justification |
| Sites.FullControl.All | Used to authenticate the Target Tenant site for migration activities, including exporting OneDrive data using the Migration API. |
| User.Read.All | Used to retrieve details of all users from the Target Tenant, which are utilized for mapping user permissions on OneDrive files and folders. |
| Group.Read.All | Used to retrieve details of all types of groups from the Target Tenant, which were then used to map the group permissions for OneDrive files and folders. |
| Profile | This scope allows the app to retrieve basic user profile information from the Target connector Account. |
| Offline_access | This scope grants long-lived access by allowing the app to obtain a refresh token, enabling it to request a new access token without requiring the Target connector user to sign in again. |
| Openid | It allows the application to authenticate the Target connector and obtain an ID token containing claims about the authenticated Target connector. |
- Click ✅ Accept to grant the requested delegated permissions.
- Once completed, the Azure AD application will be granted the necessary delegated permissions in the Source and Target Tenants.
Option 2: Grant Consent using the “Configure” Option (If the Service Account is a Global Administrator)
If the Service Account is a Global Administrator, you can directly grant consent by following these steps:
- Under “Admin Consent” tab, Click the Configure button.
- Sign in using the Global Administrator Account.
- Review the requested permissions.
- Click Accept to grant the required delegated permissions.
- 🔁 Repeat these steps for both the Source and Target Tenants
Requested Permissions :
| Permission | Justification |
| Have full control of all site collections | Allows the application to have full control of all site collections on your behalf. |
| Read all groups | Allows the app to list groups, and to read their properties and all group memberships on your behalf. Also allows the app to read calendar, conversations, files, and other group content for all groups you can access. |
| Read all users’ full profiles | Allows the app to read the full set of profile properties, reports, and managers of other users in your organization, on your behalf. |
| Maintain access to data you have given it access to | Allows the app to see and update the data you gave it access to, even when you are not currently using the app. This does not give the app any additional permissions. |
Step 5: Source and Target Connection Configurations
Connect the Source and Target Service Accounts by following the below steps.
- In the Prerequisites tab, under Connections section, click the Configure button.
- When the confirmation popup appears, wait for the success message box to appear with message ‘Successfully Configured’.
- Click OK to proceed.
Once the sign-in process for Source is completed, follow the same steps to configure the Target.
7. Mapping
To migrate the document library and permissions from the source to the target tenant, user mapping and group mapping are required. Before starting the migration process, go to the mapping section and map the required migration for scoped users / groups.
7.1 User Mapping
User Synchronization
Navigate to Mapping -> USERS -> Click ![]() Sync to synchronize all users from the source tenant.
Sync to synchronize all users from the source tenant.
Note:
Apart from Initial Migration, you have to perform this step again during Incremental Migration to sync the newly added users (if any).
Once synchronization is complete, users can be mapped using one of the following Options:
User Mapping Option 1: Import CSV [Recommended]
- After user synchronization, click Export CSV in USERS tab, to export the source user details in a file.
- Update the exported file by adding the target details using either the target User ID or target User UPN.
- Import the updated CSV file by clicking Import CSV.
CSV Format for User Mapping:
| Source UPN | Target UPN |
| user1@source.com | user1@target.com |
User Mapping Option 2: Auto-Map
After syncing the users, you can use the AutoMap feature for quick mapping:
- Click the AutoMap button.
- This option facilitates automatic user mapping based on the display name when it is identical in both the source and target tenant.
Note:
If any migration-scoped users remain unmapped still,add required mappings using previous option(Option 1).
User Mapping Option 3: Individual User Mapping
Once user synchronization is complete, repeat the below process for each of the Scoped Source User.
- Locate the Target UserName column.
- Click the Edit icon
 .
. - The Edit Target Resource dialog box will appear, displaying all available target users.
- Manually search the required target users from the list and map them.
Note:
If the expected target users are not listed, click on “Sync”. Once the synchronization is complete, proceed with the mapping process.
- Click OK to save the mapping.
7.2 Group Mapping
Group Synchronization
Navigate to Mapping -> GROUPS tab -> Click ![]() Sync to synchronize all Office 365/security groups from the source tenant.
Sync to synchronize all Office 365/security groups from the source tenant.
Note:
Apart from Initial Migration, you have to perform this step again during Incremental Migration to sync the newly added groups(if any).
Once Group synchronization is complete, Groups can be mapped using one of the following Options:
Group Mapping Option 1: Import CSV [Recommended]
- After group synchronization, click Export CSV to generate a file containing source groups details.
- Update either the Target Group Id value in “Target Id” Column or Target Group UPN value in “Target Mail” column in the exported excel file.
- Import the updated CSV file by clicking Import CSV.
CSV Format for Group Mapping:
| Source Mail | Target Mail |
| group1@source.com | group1@target.com |
Group Mapping Option 2: Auto-Map
After syncing the groups, you can use the AutoMap feature for quick mapping:
- Click the GROUPS -> AutoMap button.
- This option facilitates automatic group mapping based on the display name when it is identical in both the source and target tenant.
Note:
If any migration-scoped group remains unmapped still, add required mappings using previous option(Option 1).
Group Mapping Option 3: Individual Group Mapping
Once Group synchronization is complete, repeat the below process for each of the Scoped Source Group.
- Locate the Target Group Name column.
- Click the Edit icon .
- The Edit Target Resource dialog box will appear, displaying all available target groups.
- Manually search for the required target groups from the list and map them.
Note:
If newly created groups or expected groups are not listed, click on Sync.
- Once the synchronization is complete, proceed with the above mapping process.
- Click OK to save the mapping.
Once all the above preparatory steps are done, you are ready to create a Migration Task.
Note:
We recommend running a small Pilot Migration (perhaps one or two Users) before moving all User’s OneDrive documents, to validate your setup and measure throughput.
Start OneDrive Migration
1. Get All User’s Documents
During the Initial Migration, to retrieve user documents from the source tenant, follow the below steps (AND)
- Navigate to OneDrive tab -> SOURCE -> Click the arrow next to Sync

- A dropdown menu will appear with three options.
Get Documents Option 1: Sync All User Documents
Select “Sync All Users Documents”, to sync all the available user’s Document Libraries from the source tenant.
Note:
Before the actual Migration, perform this step to sync the Document Libraries of the newly added users(if any).
Get Documents Option 2: Sync Selected User’s Documents
- Select the users whose Document Libraries has to by sync.
- Select “Sync Selected User’s Documents”.
Get Documents Option 3: Sync documents from excel
- This Option is used to sync the user Document Libraries for bulk users.
- Click Sync documents from excel -> Sample excel to download a template excel.
- Update the source user ID value in ”User Id“ Column and User UPN value in ”Email“ column in the exported excel file.

Now, Select Sync Documents from Excel -> Sync document using excel synchronize the users’ Document Libraries who are added in the exported excel file.
Synchronization Process:
- Once the Document Libraries are imported, a validation dialog box will appear with the Remarks “Ready for sync.”
- Click “PROCEED” to initiate the synchronization process.
- A confirmation dialog box will appear.
- If the Service Account already has Secondary Admin access for all the scoped users, click “Cancel”
- If the Service Account does not have a Secondary Admin access for all the scoped users, click “OK”. This triggers the execution of a script in the background to grant Secondary Admin access for Service Account for the selected users.
- Now, a task is created and the Document Libraries for the selected users are retrieved.
2. Migrate User’s Documents
Once the user document synchronization is complete, proceed with the migration using one of the following methods:
Option 1: Migrate Documents of Selected Users
- Select the users whose Documents has to be migrated.
Note:
Selecting multiple users through the UI is supported.
- Hover over the “Migrate
 “ option to open a dropdown menu.
 - Click “Migrate selected documents.”
- A Mapping Details dialog box will appear:
- Verify if the user mappings are correct.
- If any users are unmapped or mapped incorrectly, you can get them mapped or corrected at this stage.
- Post correction of the mappings, click on “PROCEED” to generate migration tasks for each selected User.
Option 2: Migrate Documents using Excel [Recommended when migrating bulk users]
- Hover over the “Migrate “ dropdown and select Migrate documents from excel -> Migrate Document using Excel.
- Now, choose the Excel file used for syncing the documents.
Migration Process
- A validation dialog box appears with the Remarks “Ready for Migration”.
- Click “PROCEED TO MAPPING”
- Review : The application will redirect to the Mapping Details dialog box, allowing to review user mappings.
- If any users are unmapped or mapped incorrectly, you can get them mapped or corrected at this stage.
- Once verified, click “PROCEED” to continue.
The application will generate tasks for each User and initiate the migration process.
Task Status
You can track the progress and migration status in the OneDrive -> TASKS section.
- Tasks in Queue:
After task creation, it first enters the QUEUE section, awaiting processing.
- Tasks in InProgress:
The task then moves to IN PROGRESS section, where actual migration begins. During this stage, all documents are processed, and files are transferred from the source to the target.
- Tasks in Pause:
The task can be paused if needed, temporarily halting the migration process. It can be resumed at any later point of time.
- Task completed:
Once the migration is successfully completed, the task moves to the COMPLETED section.
How to Retry the task?
The Retry function helps resolve errors when a task is completed with an error or failure.
Steps to Perform Retry:
- Navigate to OneDrive→ TASKS → COMPLETED section.
- Identify the tasks with Actual status of “Failed”
- Select the tasks you want to retry.
- Click
 Retry to reattempt the migration.
How to trigger ‘Incremental Migration’?
The Re-run function enables incremental migration for newly added items in the source User’s Document Libraries after the initial migration.
Steps to Perform Incremental Migration:
- Navigate to OneDrive → TASKS → COMPLETED section.
- Select the Tasks that require Incremental Migration.
- Click ‘
 Rerun’ to initiate the Incremental Migration.
Note:
If the Actual status is “Failed”, review the errors/failures with the support team before proceeding with the Incremental Migration.
Troubleshoot
If you require support or guidance on the errors, warnings or non-migrated items, get the logs and mail them to support@jijitechnologies.com for further analysis.
To get the logs, go to “Settings” tab >> Under “Logs” section >> Add a Query Filter for TimeStamp (Click on “ADD CONDITION” if you want to add more Query Filters) >> Click on “EXPORT LOGS”.
Reports
OneDrive Migration Summary Report
The “OneDrive Migration Summary” report provides a comprehensive overview of the Apps4.Pro migration, detailing the total number of folders, files, and other items in the source drive, along with the Apps4.Pro migrated counts for each item. This report helps ensure the completeness of the migration process and verifies data consistency between the source and destination environments.
To view the report, navigate to OneDrive → MIGRATION SUMMARY tab.
Conclusion
In summary, using Apps4.Pro Migration Manager for OneDrive ensures a seamless and secure transfer of your files and documents without any data loss. By following the migration steps, you can confidently migrate OneDrive content between Office 365 tenants. For any additional questions, please refer to our FAQs or contact our support team at support@jijitechnologies.com.
 Manage


 Migrate

