

Viva Engage (Yammer) Tenant to Tenant Migration Guide
Introduction
The Apps4.Pro Migration Manager guide covers the step-by-step process of migrating Microsoft Viva Engage (formerly Yammer) communities between Office 365 tenants or within the same tenant, providing a comprehensive, end-to-end Yammer migration solution.
It includes all components of Viva Engage (Yammer), including Internal & External Networks, Network Users, Groups (communities) & Members, post, Group Files and much more.
Apps4.Pro Migration Manager supports Viva Engage (Yammer) Migration through the following approaches
- Non-Native mode to Native mode.
- Hybrid mode to Native mode.
- Port Viva Engage (Yammer) Networks across Data Centers (Geo-switch)
Scope of Microsoft Viva Engage (Yammer) Migration
The migrated and non-migrated items for Microsoft 365 Viva Engage (formerly Yammer) migration from one tenant to another are listed below.
No Limitations
- There are no limitations on the number of networks, communities, posts and files that can be migrated.
- Securely migrate files of any size without limitations.
Roles & Licenses for Yammer Migration
- Valid Microsoft 365/Office 365 License with “Viva Engage (Yammer)” app enabled is required for Source & Target Connector Accounts.
- Yammer Administrator + User Administrator role is required for both Source & Target Connector Accounts.
- Source Connector Account should be a Member of the “Viva Engage (Yammer) Private Groups” that you chose to migrate. (Please refer – How to Add Source Connector Account as a member in the Private Group).
Architecture Diagram

Pre-Migration Setup for Yammer Migration
Before migrating Viva Engage (Yammer) using Apps4.Pro Migration Manager, it is essential to understand the migration requirements for both the Source and destination endpoints. Ensure that all the following requirements are met for a smooth migration process.
Pre-requisites
To migrate an External network to target client, a Network has to be pre-existing / created manually in the Target Viva Engage (Yammer) Portal.
App Installation
Contact us at presales@apps4.pro to get the latest version of the Viva Engage (Yammer) Migration Tool download and installation process.
During the installation process, all necessary software required for the application (listed below) will be installed.
- Node-v20.9.0-x64
- Microsoft EdgeWebView2 Runtime
- ASP.NET Core Runtime 6.0.20 x64
- .NET Desktop Runtime 6.0.21 x64
- Dotnet-sdk-3.1.426
Connect your Source & Target Environments
Source Connector Account – Sign-in
Establish a connection with the Source Connector Account by signing in through the Apps4.Pro Migration Manager app.
Steps to Connect:
- Go to the Setup tab in the Migration App.
- Under Source Connection, click on the Copy & Open button.
- Paste the copied code into the authentication window.
- Enter the Source Connector Account details to complete the connection.
Target Connector Account – Sign-in
Establish a connection with the Target Connector Account by signing in through the Apps4.Pro Migration Manager app.
Note: For Migration across Data Centers (Geo-Switch), ensure the Target Connector is the re-provisioned Tenant in the Target Geo.
Steps to Connect:
- Go to the Setup tab in the Migration App.
- Under Target Connection, click on the Copy & Open button.
- Paste the copied code into the authentication window.
- Enter the Target Connector Account details to complete the connection.
Note: Apps4.Pro supports MFA and Modern Authentication and hence there is no need to disable security features.
Configure Yammer Connectors
To migrate the Viva Engage (Yammer) Networks, you have to configure the following:
- Yammer Source Connector
- Yammer and Viva Engage API Target Connectors
Application Tenant Data Refresh
Perform an Application Data Refresh before you start the Microsoft Yammer Migration.
- Navigate to “Settings -> App Data”.
- Select the checkbox next to the below Resources to perform a full sync of the app data:
- Source Tenant Users
- Target Tenant Users
- Source Tenant Groups
- Target Tenant Groups
Note:
- Click on
 icon to download the Source and target users, which can be used to frame the Tenant-level Users Mapping.
 - If the checkbox is unselected, it performs an incremental refresh from the last time it was refreshed. You could also find the time when the data was previously refreshed here.
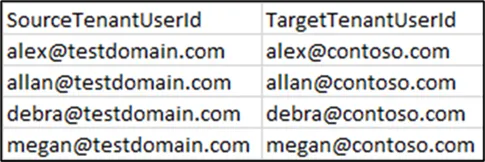
Application User Mapping
The migration scoped users in the Source and target tenants need to be mapped so the app can utilize this information to add membership during migration.
Steps to Perform User Mapping:
Navigate to the “Mapping” tab → USERS MAPPING. Here, you can add user mappings based on any of the options listed below.
Option 1 – Individual Manual Mapping: Manually add user mappings using the “Add” option.
Option 2 – Bulk Mapping through Auto Map: If user’s display name or UPN in the Source and target tenants are the same, our tool provides an “Automap” feature to streamline the mapping process.
Option 3 – Upload bulk mappings through CSV: If the display names of the users in the Source and target tenants are different, you can download the sample file, add the user mappings, and import them using the “Import CSV” option.
You can download the tenant-level users to frame the Mapping CSV, please refer to Application Tenant Data Refresh.
Sample CSV File
Important:
- Delete: Use this option , if you need to remove a target user mapping.
- Edit: Use this option , if you need to modify a target user mapping.
- Clear All: Use this option , if you need to clear all the previously added mappings in a single shot.
How to Add Source Connector Account as a member in the Private Group
To migrate a Private group, Source Connector Account should be member of that Private group. Follow the below mentioned steps.
- Go to Plan Tab → Reports → Under Yammer, select “Source Network Groups” report.
- Select the Network(s) to list all the groups inside the selected network(s).
- Now filter the Group Privacy column as “private” and IsMemberGroup column as “false”
- You can see the private groups where the Source Connector is not a member.
- Select the groups and click on Manage Members and Owners. Then add the Source Connector as a member by clicking on the (+) option and update.
Settings
Based on the requirements, these settings can be enabled.
Delta Migration for Geo-Switch [OPTIONAL]
Apps4.Pro uses Yammer Import-Export features to “Port Viva Engage (Yammer) Networks across Data Centers (Geo-Switch)”. To enable Delta Migration for such cases, follow the below mentioned steps.
Navigate to Settings -> Other settings -> Migration Settings ![]() -> Yammer Settings
-> Yammer Settings
- Setting 1 : Disable setting “Yammer Group Migration with API (Recommended)”
- Setting 2 : Enable setting “Yammer Export Delta Migration”
User Impersonation Settings [OPTIONAL]
User Impersonation is the process in which Posts are posted by the users themselves in the target. Please consider the below with regards to User Impersonation.
- BY DEFAULT, Apps4.Pro follows User Impersonation and hence Posts are posted by the users themselves in the target.
- If any of the source user is not active, user profile will not be found in the target and hence the migration job cannot proceed. To avoid this,
- Navigate to Settings -> Other settings -> Migration Settings
 -> Yammer Settings.
 - Enable the option ‘Skip User Impersonation if active Yammer User Profile not found in Target Tenant’.
- Navigate to Settings -> Other settings -> Migration Settings
- If you like to migrate the post for unmapped users, then you can proceed enabling the below setting.
- Navigate to Settings -> Other settings -> Migration Settings -> Yammer Settings.
- Enable the option ‘Skip User Impersonation if mapping/membership failure.
- Navigate to Settings -> Other settings -> Migration Settings
Note: If you enable any of the above setting, ‘User Impersonation’ is skipped and the posts will be posted by the Service Account instead.
Skipping User Impersonation will look like this :
Source
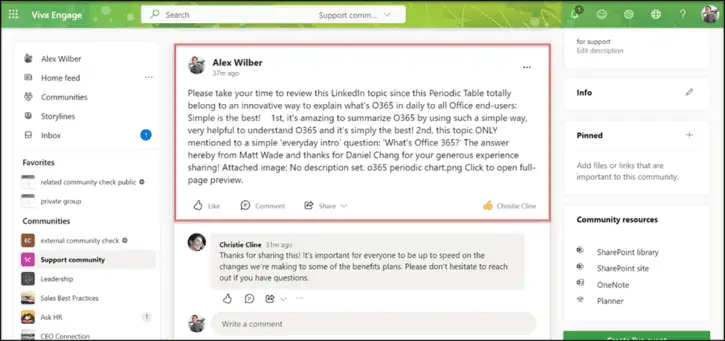
Target
Yammer Attachment Files Vs Group Files
Apps4.Pro provides the choice to migrate only the files attached to message or the files part of the associated SharePoint Site.
Navigate to Settings -> Other settings -> Migration Settings ![]() -> Yammer Settings
-> Yammer Settings
- Make sure the Setting “Yammer Group Migration with API(Recommended)” is enabled.
- Choose one of the below options as required
- Choice 1 : “Migrate only message attachment files”
- Choice 2 : “Migrate all group files” : Migrates the Files & Folders part of the Group associated SharePoint Site’s Default Document Library.
Once all the above preparatory steps are done, you are ready to create a Migration Job.
Note: We recommend running a small pilot migration (perhaps one or two communities) before moving all communities, to validate your setup and measure throughput.
Start Microsoft Viva Engage (Yammer) Migration
Approach 1 : Source & Target Tenant exists during Initial Migration
Step 1 : Create Job
- Navigate to Migrate tab
- Enter a Job Name
- Select Source as Yammer
- Select the Networks to Migrate
- Select “Yammer Migration”
- Click Next
Step 2 : Target Settings
Network Settings
In this step, you can provide the target network(s) to migrate data. Here,
- You can map a Source Network with a Network in Target.
- You can also cross-map – Map an Internal Network with an External Network and vice versa.
Group Settings
In this step, you can provide the target group(s). You have following options to select target groups.
- Migrate into a new group.
- Migrate into an existing group.
Step 3 : Job Summary
In this step, you can view the summary of job. After checking the summary, you can select one of the following two options.
- Save Job -> It saves the current job, then you can run later by clicking Start button from Migration Jobs grid.
- Save & Migrate Job -> It saves the current job and starts the migration process immediately.
Step 4 : Execute Saved Jobs
Under Migration Jobs section – the Jobs and their summary are listed. You can opt to run the previously saved jobs by clicking the Start button under Action column.
You can also find the progress of the Jobs and their summaries here.
Approach 2 : Only Source Tenant exists during Initial Migration (Geo-Switch)
This approach supports migration between data centers (Geo-Switch) by using the Export & Import options. The porting of data across Data Centers is done in 2 stages.
Stage 1 : Yammer Export
Important: Do remember to perform this step before the cut over of the Source Data Centre.
- Navigate to Migrate tab
- Enter a Job Name
- Select Source as Yammer
- Select the Networks to Migrate
- Select Yammer Export
- Click Next
Delta Migration :
If you would like to export only the data for a certain period instead of the entire data, you can perform Delta Migration by following the below steps
- Make sure the settings mentioned in Delta Migration for Geo-Switch is enabled
- Enable Delta Migration
- Mention the Start Date and Due Date
Now, Viva Engage (Yammer) data from Source Tenant is exported and stored in your local machine.
Note: You can find the progress of the Job Under “Migration Jobs” section – the Jobs and their summaries are listed.
Stage 2 : Yammer Import
Important: Perform this step post completion of the re-provision of Viva Engage (Yammer) Network in Target Data Centre.
Step 1 : Create Job
- Navigate to Migrate tab
- Enter a Job Name
- Select Source as Yammer
- Choose Yammer Import
- Select the Exported Networks to Migrate
- Click Next
Step 2 : Target Settings
Network Settings
In this step, you can provide the target network(s) to migrate data. Here,
- You can map a Source Network with a Network in Target.
- You can also cross-map – Map an Internal Network with an External Network and vice versa.
Group Settings
In this step, you can provide the target group(s). You have following options to select target groups.
- Migrate into a new group.
- Migrate into an existing group.
Step 3 : Job Summary
In this step, you can view the summary of job. After checking the summary, you can select one of the following two options.
- Save Job -> It saves the current job, then you can run later by clicking Start button from Migration Jobs grid.
- Save & Migrate Job -> It saves the current job and starts the migration process immediately.
Step 4 : Execute Saved Jobs
Under Migration Jobs section – the Jobs and their summary are listed. You can opt to run the previously saved jobs by clicking the Start button under Action column.
You can also find the progress of the Jobs and their summaries here.
Once the Job is complete, the offline downloaded data (via export) is transferred to the tenant in the Target Data Center.
How to resolve errors using ‘Retry’ Option ?
The Retry function helps resolve errors when a Job is completed with an error or warning.
Steps to Perform Retry:
- Navigate to Migrate tab → Migration Jobs .
- Identify the Jobs with a status of “Completed with Errors” or “Completed with Warnings.”
- Click ‘Retry’ under Action, to reattempt the migration.
How to perform ‘Incremental Migration’?
The Re-run function enables incremental migration for new Users & Posts in the Source Networks after the Initial Migration.
Steps to Perform Incremental Migration:
- Navigate to Migrate tab → Migration Jobs .
- Identify the Job that require Incremental Migration.
- Click ‘Re-run’ under Action, to initiate Incremental Migration.
Note: If the task status is “Completed with Errors” or “Completed with Warnings”, review the errors/warnings with the support team before proceeding with the Incremental Migration.
Email Notification
End users get an email notification when migrating the below mentioned items.
- Group invite
- Praise
- Update
- Update with @ mentions
- Announcement
In order to prevent these unpleasant notifications, create a Transport rule from Exchange.
Creation of Transport rule
Please follow the steps below to create a Transport rule from Exchange
Step 1: Open the Exchange Admin Center using this URL https://admin.exchange.microsoft.com.
From the Left Menu Pane, click Mail flow -> Rules, then click the + Add a rule action to create a new rule.
Step 2 : Fill the highlighted fields to Set rule conditions.
- Name – Type the name of the rule
- Apply this rule if
| The Sender | address includes any of these words |
Click the Edit icon and add the email address notifications@yammer.com (and also notifications@eu.yammer.com if your tenant is located in the European region) to block the assignee notifications.
- Do the following
| Block the message | reject the message and include an explanation |
Click the Edit icon and enter a sentence such as “Blocked notification during Yammer Migration” to learn why this message was prohibited.
Step 3 : Click Next
Step 4 : Set the Rule settings , select Rule mode as Enforce and click Next
Step 5: Now review the rule and click Finish
Step 6: The created rule is disabled by default, therefore to enable it, open it and enable the toggle button, then wait until the Status changes to Enabled.
Post Migration
End User Experience
Posts along with replies
Source
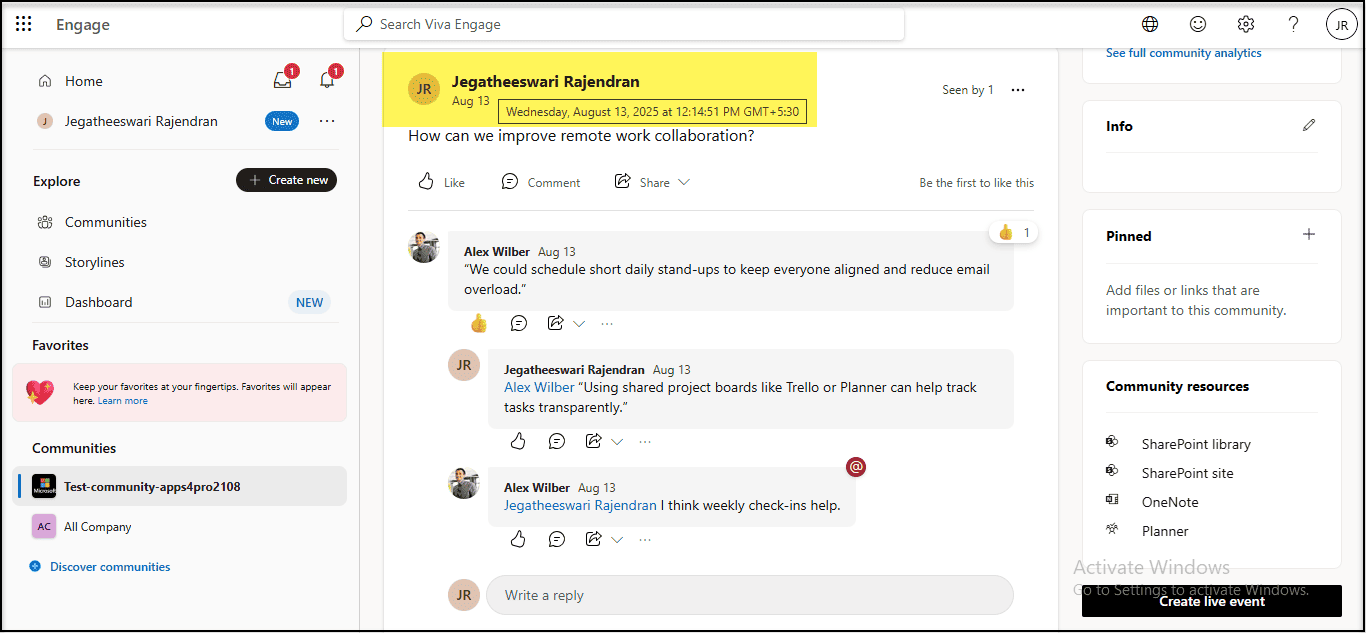
Target
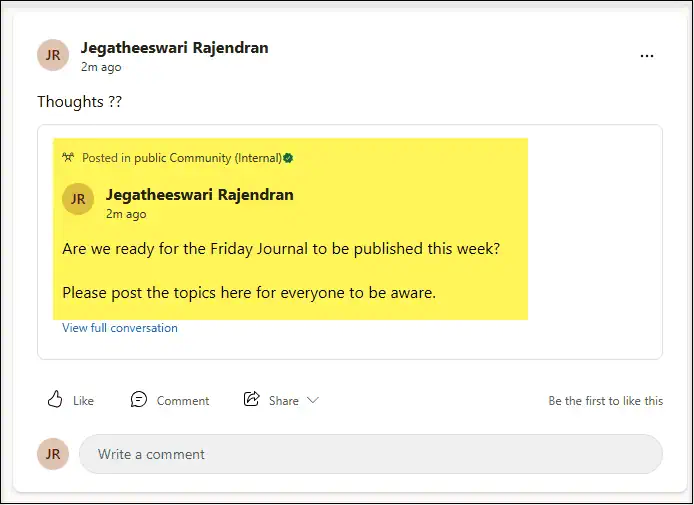
In the migration experience, the conversations will be posted by the mapped target user with posted time and date at the top of each message/reply.
Posts with attachments and nested replies, CC
Source

Target

Considerations
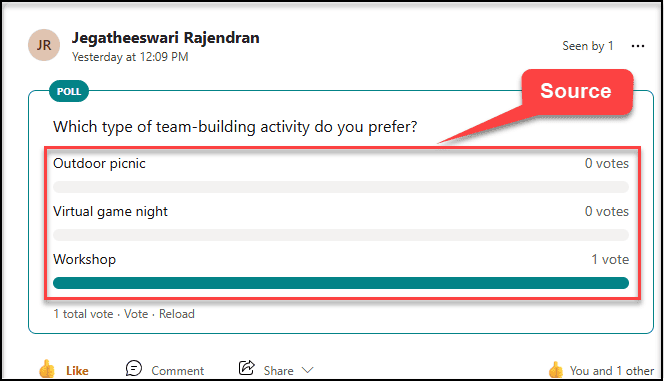
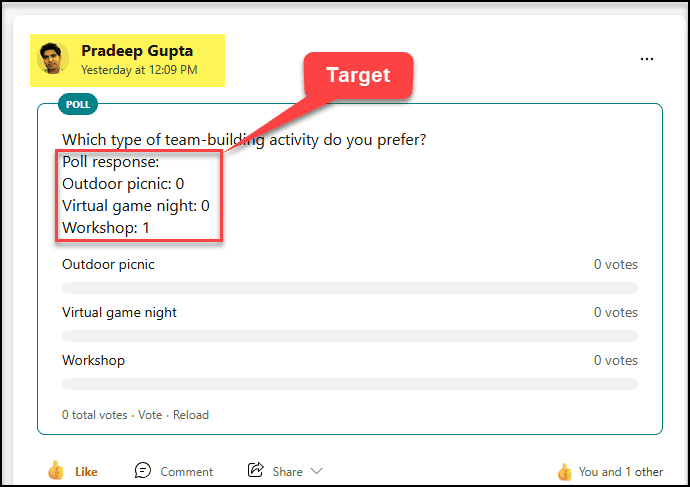
Polls
The Poll Response in Source are posted part of the Question in the Target.
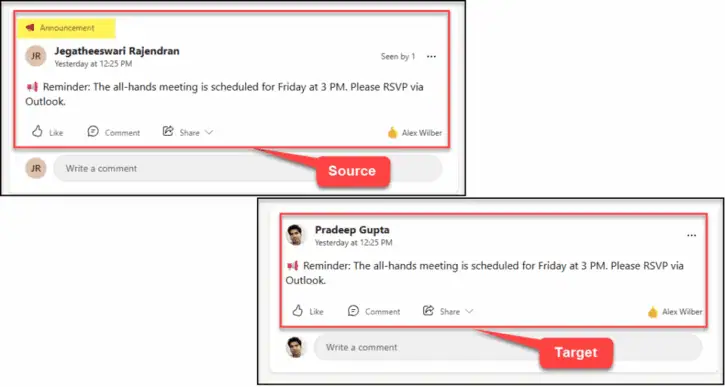
Announcement Messages
Announcement Messages will be migrated as Normal Conversations due to API limitations.
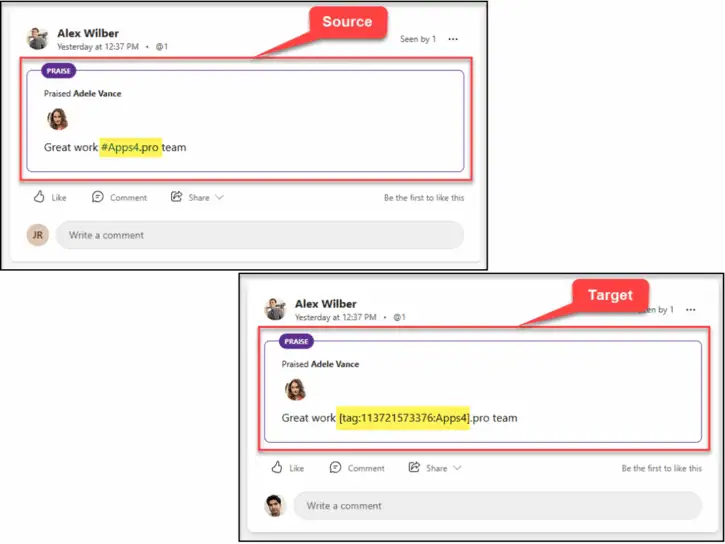
Tags in Praise Messages
Tags in Praise Messages will be migrated as a regular text in Target.
Text Formats
Text Formatting will not be reflecting in Target as in Source Tenant.
1. Formats such as Bold, Italic etc.
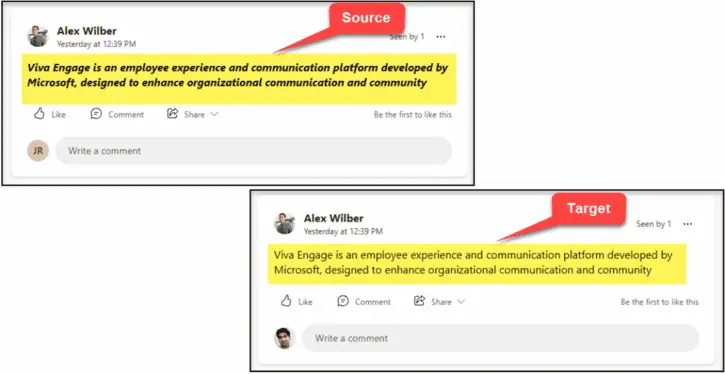
2. Formats such as Numbered list / Bulleted list
Numbered / Bulleted lists are migrated as a paragraph in the Target.

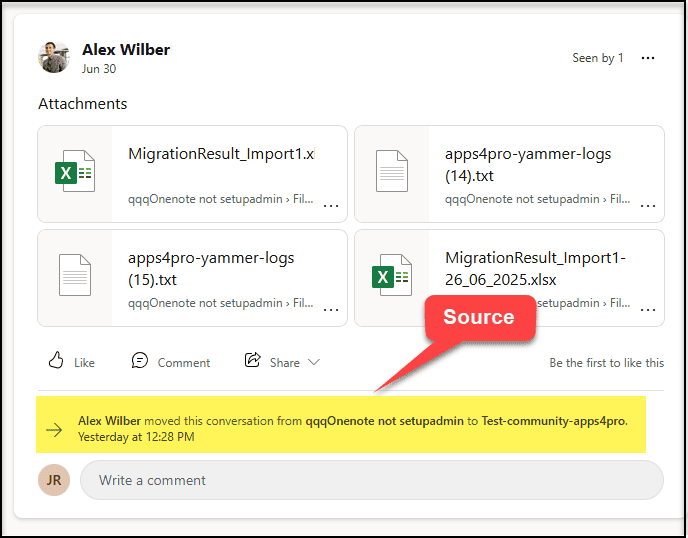
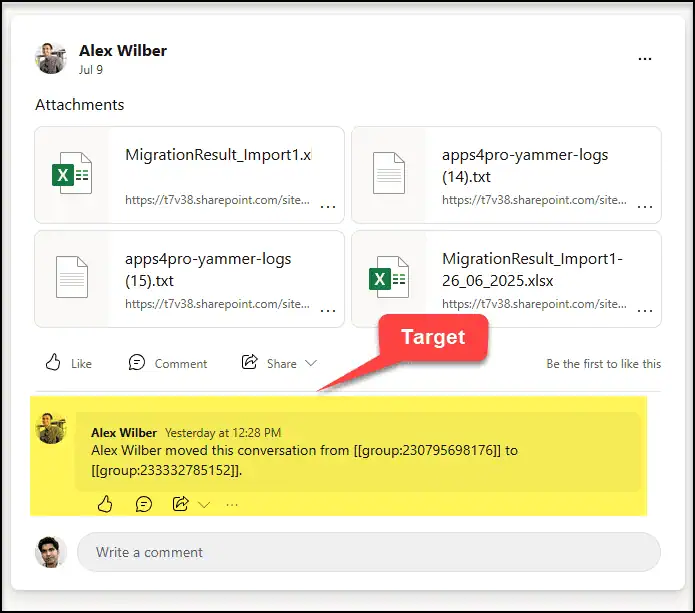
Moved Conversations
Moved Information is added as reply with Group names replaced with Group ID.
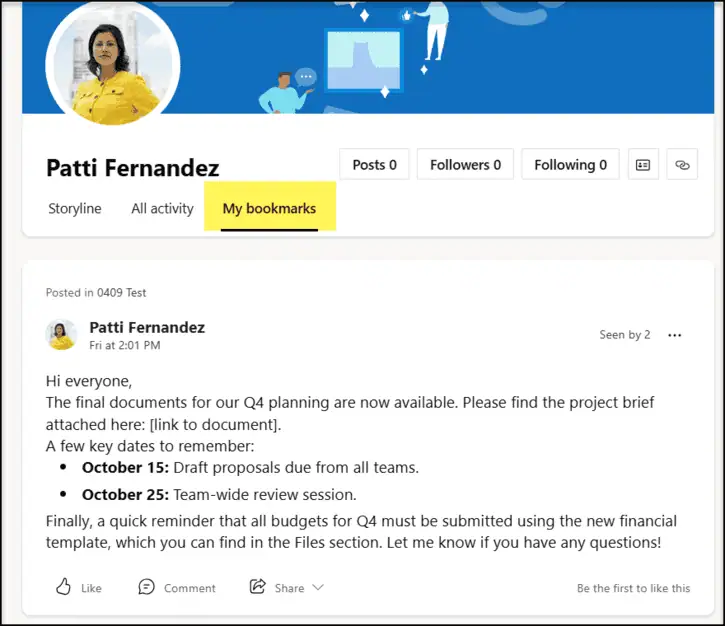
Bookmarks
Bookmarks will not be migrated while the conversation will be migrated.
Shared Conversations
The conversations that are shared from another group will not be migrated.
Upvote in Questions
Upvote in Question is not migrated whereas Best Answer and Verified Answer are migrated.


Troubleshoot
If you require support or guidance on the errors, warnings or non-migrated items, get the logs and mail them to support@jijitechnologies.com for further analysis.
To get the logs, go to the Settings tab -> Tracer Logs and download
- Export Logs
- Yammer Logs
- On clicking “Yammer Logs”, a popup appears.
- Select the problematic job(s)
- Click OK to export the Yammer Logs.
Reports
The “Yammer Migration Summary” report provides a comprehensive overview of the Apps4.Pro Viva Engage migration, tabulating the details of the Source Networks, Source and Target Groups.
Steps to Generate the “Yammer Migration Summary“ Report:
- Go to Plans → Reports → Migrated Summary V2 section.
- Select the “Yammer Migration Summary“ report.
- Click the “Generate” to populate the values.
- Click on
 (Export icon) to download the Inventory Report.
Conclusion
In summary, Apps4.Pro Migration Manager ensures a dependable and hassle-free migration of Microsoft Viva Engage (formerly Yammer) data between Office 365 tenants. By following this guide, administrators can maintain data integrity, minimize disruption, and support continuous collaboration across communities. For additional assistance, explore our FAQ section or contact our support team at support@jijitechnologies.com.
 Migrate
 Manage

