

Microsoft Teams Chat Tenant to Tenant Migration Guide
Introduction
The Tenant-to-Tenant Microsoft Teams Chat Transfer Guide provides a step-by-step process for migrating Microsoft 365 Teams private chat conversations from one tenant to another using Apps4.Pro Migration Manager.
It covers the entire components of Teams Private Chat, including One-on-One Chat, Group Chats, Meeting Chats, attachments, memberships & inline images part of the chat, stickers, emojis and much more.
We migrate the entire chat history, in addition with options to specify a preferred start date to avoid the additional efforts of migrating the entire history.
No Limitations
- There are no limitations on the number of 1:1 / group / meeting chats, participants and OneNote files that can be migrated. The process ensures a seamless transfer of all associated data without any restriction.
- Securely migrate files of any size without limitations.
Scope of Microsoft Teams Chat Migration
The migrated and non-migrated items are listed below for Teams Private Chat Migration.
Roles & Licenses for Teams Chat Migration
- Valid Microsoft 365/Office 365 License with “Microsoft Teams” app enabled is required for Source & Target Connector Accounts & all Migration Scoped Users.
- Admin consent and Application Permission is required for Source Connector Account.
- Delegated Permission is required for the Target Connector Account.
- Secondary Site Collection Admin Access is required for Target Service Account to all the scoped target user’s OneDrive when attachments have to be migrated.
Architecture Diagram

Pre-Migration Setup for Teams Chat Migration
Before migrating, Teams Chats using Apps4.Pro Migration Manager, it is essential to understand the migration requirements for both the source and destination endpoints. Ensure that all the necessary prerequisites, such as configuring permissions, preparing Azure storage for scalability, and adjusting tool settings, are met for a smooth migration process.
Admin Consent & Delegate Permission
Apps4.Pro has its own Azure AD application, which gets registered during the application configuration.
Since migration uses service accounts with minimal privileges, Admin must provide Admin Consent & Delegate Permission just by clicking a link [Please contact us at presales@apps4.pro for the link]
Ask the admin to open the consent URL in their browser and sign-in with the admin account.
- Click “Accept” to provide consent to use the Apps4.Pro app.
When the admins consent using the consent URL,
- Application registered : “Apps4.Pro Manager” when consenting, where the required scopes are added with application permissions.
- API involved : Microsoft Graph API and REST API
Note:
Apps4.Pro supports MFA and Modern Authentication and hence there is no need to disable security features.
Create Azure Table Storage Account and Get Connection String
For tenants with larger environments and bulk data, in order to perform migration parallelly in multiple machines to speed up the process, we need to configure the Table Storage in the tool. Start by creating an Azure Storage Account.
Step 1: Login to Azure Portal using the link below.
Recommended:
You can login with either Source or Target tenant. But it should have an active Azure Subscription.
Step 2: Search for “Storage accounts” and click on it
Step 3: Click on “+ Create” button
Step 4: Fill in the required details as mentioned below, and click “Review + create”
Subscription – Valid subscription that the logged in account has access
Resource group – New dedicated resource group for Teams Chat Migration
Storage account name – Any unique name
Region – Select tenant region
Performance – Standard (Default)
Redundancy – Locally – Redundant Storage (LRS)
Step 5: Click on Create and wait for few seconds for Deployment.
Step 6: Once deployment completed, click on “Go to resource”
Step 7: From the left side menu, scroll up and expand “Security + Networking”. Click on “Access Keys”.
Copy the “Connection String” under “key1”. Copy and note this value in a notepad which is required to input in Apps4.Pro Migration Manager after installation.
App Installation
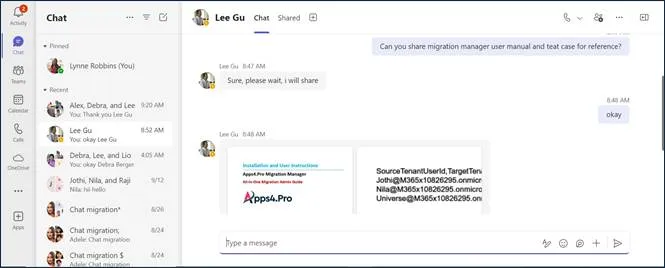
Contact us at presales@apps4.pro to get the latest version of the Private Chat Migration application download and installation process.
During the installation process, all necessary software required for the application (listed below) will be installed.
- Node.js 20.20.2 x64
- Microsoft EdgeWebView2 Runtime
- .NET Desktop Runtime 10.0.4 x64
- ASP.NET Core Runtime 10.0.4 x64
- Dotnet-sdk-10.0.203
Connect your Source & Target Environments
Source Connector Account – Sign-in
Establish a connection with the Source Connector Account by signing in through the Apps4.Pro Migration Manager app.
Steps to Connect:
- Go to the Setup tab in the Migration App.
- Under Source Connection, click on the Copy & Open button.
- Paste the copied code into the authentication window.
- Enter the Source Connector Account details to complete the connection.
Target Connector Account – Sign-in
Establish a connection with the Target Connector Account by signing in through the Apps4.Pro Migration Manager app.
Steps to Connect:
- Go to the Setup tab in the Migration App.
- Under Target Connection, click on the Copy & Open button.
- Paste the copied code into the authentication window.
- Enter the Target Connector Account details to complete the connection.
Configure Private Chat Connectors
To migrate the Teams Private Chats, we have to configure the following:
- Private Chat Source & Target Connectors &
- Teams API Target Connector
Application Tenant Data Refresh
Perform an Application Data Refresh before you start the Migration.
Navigate to “Settings -> App Data” and select the checkboxes next to the app data resources listed below to perform a full sync.
- Source Tenant Users
- Target Tenant Users
Note:
- Click on
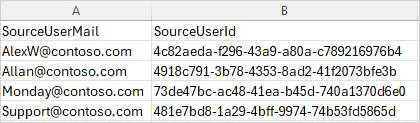
 icon to download the source and target users, which can be used to frame the Tenant-level Users Mapping.
 - If the checkbox is unselected, it performs an incremental refresh from the last time it was refreshed. You could also find the time when the data was previously refreshed here.
Assign Apps4.Pro Licenses to Migration Scoped Users
To add chat participants to the migrated target chats, a Apps4.Pro Migration Manager license is required for each participant included in the migration scope.
Please assign the licenses by following the steps below.
- Navigate to Plan tab.
- Under Reports → Private Chats, click on “Unlicensed Users”
- Select the users to assign Apps4.Pro Licenses
Option 1: Select the users from the tool
- Select Manually from the listed users
- Click ‘Assign License’
Option 2 : Select users from CSV
- Click Assign License from CSV
- Click icon to download a sample CSV
Sample CSV
- Add the Users to assign Licenses in the CSV
- Click Browse to upload the loaded CSV
- Click Add to assign licenses.
Configure Private Chat Settings
Chat Topic Separator & Position
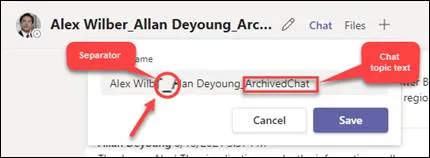
As the chats are migrated as Archived Chats, the app will create chat titles with the source’s participant names in the chat. It will appear in the format “Alex Wilber_Megan Bowen_ArchivedChat”. To customize this format, follow the steps.
- Navigate to Settings → Other settings → Migration Settings
 → Private Chat Settings.
 - Enter the below values as required.
- Custom Chat Topic Separator
- Custom Chat Topic Text
- Custom Chat Topic Position – Prefix / Suffix
When customized, it appears like below in the Migrated Chat in Target
Migrate Chat Membership [Optional]
When you migrate the chat memberships in the first place, the members of the chat will keep receiving notifications during the migration. In order to avoid these notifications, disable the option Settings → Other Settings → Migration Settings ![]() → Private Chat Settings → “Migrate Chat Membership” before the Initial Migration. It is Enabled by DEFAULT.
→ Private Chat Settings → “Migrate Chat Membership” before the Initial Migration. It is Enabled by DEFAULT.
You can migrate the memberships at a later point post the Migration is completed, either by using the following two options:
- Add Membership by Task [Recommended]: This option allows you to add memberships to the target by fetching user information from both the source and target using MS Graph. It supports both single and multiple selections and updates membership migration details in the user task details.
- Add Membership for All Migrated Chats: This option enables you to add memberships to the target using the migrated chat details from the database. It directly adds members to the migrated chats in target by creating a new task. Note that membership migration details will not be updated in individual user tasks for validation purposes, and this option does not support retry or rerun functionality.
Post completion of Initial Migration, memberships can be added into the migrated Chats, by following the steps mentioned in Step 2 : Add membership into the migrated Chats.
File Attachment (OneDrive) Migration: [Mandatory]
We have three Migration Setting options related to the Attachment (OneDrive). You can choose anyone by following the below steps.
- Navigate to Settings → Other Settings → Migration Settings → Private Chat Settings
- Under the File Attachment (OneDrive) Migration section, choose any of the 3 options.
| Option # | Option | How attachments migrated? | Go for this option, when |
| 1 | Keep Source URL | Conversation Attachments not migrated, instead Source URL is retained. | – you already migrated the attachments/files through OneDrive Migration – you want to retain Source URL in the Conversation attachments |
| 2 | Replace Target Domain in Source URL | Conversation Attachments not migrated; it will replace the Target Domain (configured in the Domain Cut-Over settings) in the Source URL. | – you already migrated the attachments/files through OneDrive Migration – you do not want Apps4.Pro to migrate them & Want to Replace Target Domain in Source URL in the Conversation attachments |
| 3 [DEFAULT] | Migrate Attachment and Replace the Source URL | Conversation Attachments are migrated, and the URLs are replaced with Target Domain (configured in the Domain Cut-Over settings) in the Source URL. | – you want Apps4.Pro to migrate the Conversation attachments & – To Replace Target Domain in Source URL in the Conversation attachments |
OneDrive Location for file migration: You can also provide a custom OneDrive folder to store the attachments.
Step 3: Click Save to apply the changes.
Inline Images, Stickers, Code Snippets, and Recording Migration (OneDrive) Settings: [Mandatory]
We have three options related to this. You can choose anyone by following the below steps.
Step 1: Navigate to Settings → Other Settings → Migration Settings ![]() → Private Chat Settings
→ Private Chat Settings
Step 2: Under Inline Images, Stickers, Code Snippets, and Recording Migration (OneDrive) Settings, choose any of the 3 options.
| Option # | Option | Inline Images, Stickers, Code snippet and Recording are stored in |
| 1 | Upload to Originator’s Target OneDrive | OneDrive of the Chat Originator |
| 2 | Upload to Task Primary User’s OneDrive | OneDrive of the User selected for migration |
| 3 | Upload to Target Service Account OneDrive | OneDrive of the Target Service Account |
Note:
As a result, inline images cannot be displayed in preview format, similar to the source.
Step 3: Click Save to apply the changes.
Cutover Settings [Domain Switch]
During Teams Private Chat Migration, the app will include the shared link of the files in the chats. This setting is required in order to retain the workable URL after the tenant cut-over (Domain switch). Based on the below migration scenarios, you can perform the required settings in the app.
| Scenario | Setting to be configured |
| Same source domain name will be moved to the target (Single domain) Ex: abc.com > abc.com OR Same source domain(s) name will be moved to the target (in case source has multiple domains) | Go to Settings > Other Settings > Private chat settings > Enable ‘Post Cutover – Retain source domain name in the target’. |
| Source tenant name will not be moved to the target Ex: abc.com > xyz.com | Go to Settings > Other settings > Target cutover settings and provide domain names before and after cutover. |
Azure Settings [Optional]
When we need to migrate chats parallelly in multiple machines, add the Azure Table Storage Connection String in Azure Settings, by following the below steps.
- Navigate to Settings → Azure Settings
- Enable Azure Table Storage. A pop-up appears.
- Click Ok.
- Enter the Azure Table Storage Connection String copied from the Step: Create Azure Table Storage Account and Get Connection String.
- Click Save.
- Confirmation pop-up appears. Click Ok.
- Important: Ensure you get a Success Message “Azure Settings saved and Table Created successfully”
Note:
Must use the same Connection String in all the parallel machines to avoid duplication.
Application Users Mapping
The migration scoped users in the source and target tenants need to be mapped so the app can utilize this information to add membership during migration.
Steps to Perform User Mapping:
Navigate to the “Mapping” tab → USERS MAPPING. Here, you can add user mappings based on any of the options listed below.
Option 1 – Individual Manual Mapping: Manually add user mappings using the “Add” option.
Option 2 – Bulk Mapping through Auto Map: If user’s display name or UPN in the source and target tenants are the same, our tool provides an “Automap” feature to streamline the mapping process.
Option 3 – Upload bulk mappings through CSV: If the display names of the users in the source and target tenants are different, you can download the sample file, add the user mappings, and import them using the “Import CSV” option.
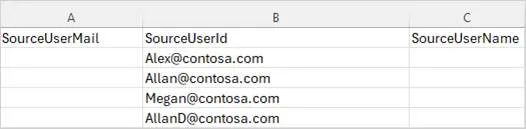
You can download the tenant-level users to frame the Mapping CSV, please refer to Application Tenant Data Refresh.
Sample CSV File
Important:
Using the “Clear All” option you can clear the previously added mappings in a single shot.
Users Without Mapping
You can add the users whose membership need not be migrated to target.
When added here, the tool skips the users and does not throw an warning for not mapped users.
To perform this,
- Navigate to “Mapping” tab -> USERS WITHOUT MAPPING.
- Add the users mapping manually using the option “Add” (OR)
- Add the User Mail & IDs in a CSV and import them using the option “Import CSV”.
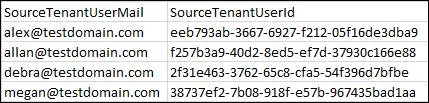
Sample CSV File
Important:
Using the “Clear All” option you can clear the previously added mappings in a single shot.
Re-sync User Domains Post Cut-Over
This STEP has to be performed post the cut-over date.
If the Source / Target is likely a New Tenant, your domain changes post cut-over. The tool picks up the new User Domains automatically post cut-over. Please follow the below steps.
- Perform an Application Tenant Data Refresh for both the source and target connectors. Refer Application Tenant Data Refresh.
- Post the cut-over date, Click on Mapping -> USERS MAPPING -> Resync UPN.
This helps the tool to re-sync the users with the new Domains.
Once all the above preparatory steps are done, you are ready to create a Migration Task.
Note:
We recommend running a small Pilot Migration (perhaps one or two Users) before moving all User’s Chats, to validate your setup and measure throughput.
Start Teams Chat Migration
Step 1: Create Task
Option 1: Choose from the listed users
Follow the below steps to choose the scoped users from the list
Step 1: Navigate to ‘Chat’ tab.
Step 2: Navigate to Source -> Users.
Step 3: Hit ‘Refresh’ to load the users.
Step 4: Select the Users whose chats to be migrated.
Please ensure that you have provided the user mapping for all the required source tenant users as mentioned in section: “Application Users Mapping”.
Step 5: Click ‘Migrate’.
Step 6: Under the Migration Settings, you have the below choices:
- Optional : Delta Migration : Enable this option to migrate messages from a specific interval. Then choose the desired date range for data migration.
- Optional : Include External Users : If you have an external user part of the chats in the source and want to include them in the target as well, enable this option.
Important:
- Tool migrates the entire chat history involving external users as participants, excluding chats initiated by external users.
- Be aware that the external users will also receive a notification during the migration process.
Step 7: Click ‘Migrate’ button.
Step 8: A Task gets created for each of the selected users.
Option 2 : Upload bulk users through CSV
Follow the below steps to upload bulk users through CSV.
Step 1: Click on the Select from CSV button. A dialog box will pop up with an option to export the “Sample CSV”.
Step 2: Click on the Sample CSV option to download the sample CSV file.
Step 3: In the downloaded sample CSV file, clear out the values for A and C columns, and in column B, insert the UPN (User Principal Name) of the migration-scoped users for task selections and save the file.
Sample CSV:
Step 4: Then Use the Browse option to import the CSV file with your scoped users whose chats need to be migrated.
Step 5: Click on “Migrate”. This will open a confirmation dialog box. The dialog box will ask for confirmation to create the task for the user.
Step 6: Click on “Yes” to confirm the task creation.
Step 7: A Task gets created for each of the user in the CSV.
After completing the task creation process, go to the tasks tab beside the source, where you can monitor the progress and migration status of the created tasks in the Tasks Report section.
Note:
You can verify the details of specific migrated items by using the “View Details” option in the task.
Option 3 : Choose to migrate individual chats
Migrate Individual Chats using option ‘Sync Chats’. Choosing which,
- Create tasks for the selected users.
- Post completion of the task, switch to CHATS tab and Click Refresh.
- Chats of the selected users are listed here.
- Choose the individual chats and migrate them.
- In addition, you can use Option ‘Copy’ to migrate the previously migrated chats.
Step 2: Add membership into the migrated Chats [Optional]
This step is required only if during Pre-Migration Setup, you have chosen to migrate memberships later as mentioned in Migrate Chat Membership.
Post the Initial Content Migration is completed,
- Navigate to Settings → Other Settings → Migration Settings
 → Private Chat Settings.
 - Enable the “Migrate Chat Membership” option.
- Navigate to Chats → Tasks → Completed Tab.
- Select the user tasks for whom you want to add chat participants.
- Click on the Add Membership dropdown.
- Click on “Add Membership by Task”.
Step 3 : How to ‘Retry’ a task?
The Retry function helps resolve errors when a task is completed with an error or warning.
Steps to Perform Retry:
- Navigate to Chats→ Tasks → Completed tab.
- Identify the tasks with a status of “Completed with Errors” or “Completed with Warnings.”
- Select the task you want to retry.
- Click ‘Retry’ to reattempt the migration.
Step 4 : How to trigger ‘Incremental Migration’?
The Re-run function enables incremental migration for newly added items in the source Chats after the initial migration.
Steps to Perform Incremental Migration:
- Navigate to Chats → Tasks → Completed Tab.
- Select the Users that require Incremental Migration.
- Click ‘Rerun’ to initiate the Incremental Migration.
Note:
If the task status is “Completed with Errors” or “Completed with Warnings,” review the errors/warnings with the support team before proceeding with the Incremental Migration.
Step 5 : Get Summary view of the Migration Tasks
- Navigate to Chat -> Summary
- Click
 Sync to load the latest Task Summary
 - All Tasks Results : Lists down all the tasks including the ones Completed with Errors & Warnings. You can also Retry the tasks that are Completed with Errors / Warnings from here.
Here, you get the
1. Overall Task-wise Success / Failed count on
– Chat
– Chat Message
– Chat Member
2. Specific error / warning wise count. - All Tasks Errors : Lists down all the tasks that were Completed with Errors. Here, you get the detailed error message Item-wise. You can also Retry the tasks from here.
- All Tasks Warnings : Lists down all the tasks that were Completed with Warnings. Here, you get the detailed warning message Item-wise. You can also Retry the tasks from here.
Post Migration
End User Experience
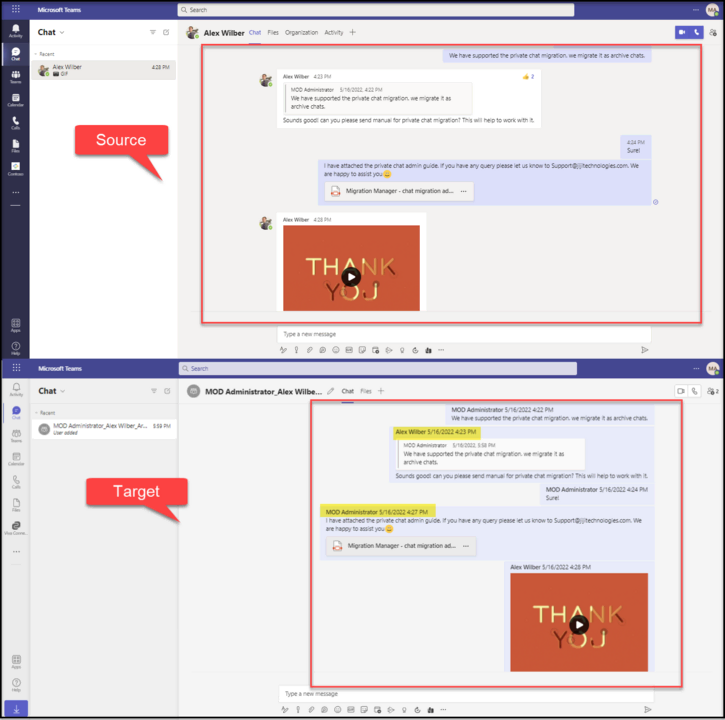
One on One Chat
Source
Target
Group Chat
Source
Target
Post Migration Activities
Note:
- Once the migration tasks are completed, the ‘Target Connector’ can be removed from all the migrated chats at once.
- Before you remove them, ensure if all the Tasks created for Migration and Incremental Sync are completed successfully.
How to Remove ‘Target Connector Account’ from the migrated chats
Part of the Migration Process, ‘Target Connector’ is added as a participant of all the migrated chats, and hence it must be removed post Migration.
To achieve this in a single shot, we can remove it by following the steps below.
- Navigate to Plan tab.
- Under Reports -> Private Chat -> Click on ‘Migrated Target Chats’ to generate the report.
- All the chats migrated to the target account are listed.
- Click
 to add the column Migrated from this Machine
 - Filter the column “Migrated from this Machine” as true
This helps to pull chats Migrated via this machine only. When Migration is run in multiple machines, this activity has to be repeated in each machine. - Select all the filtered chats and click on Manage Chat Members
- Under Actions, choose ‘Remove Member’ -> click + icon -> Search for the Target Connector Account & select it
- Click Update.
Troubleshoot
If you require support or guidance on the errors, warnings or non-migrated items, get the logs and mail them to support@jijitechnologies.com for further analysis.
To get the logs, go to the Chat tab -> TASKS -> COMPLETED -> Export Logs.
Reports
Chat Migration Summary Report
The “Migrated Chats” report provides a comprehensive overview of the Apps4.Pro migration, detailing the total number of chats, chat ID, chat Link, chat member details in the source chat, along with the Apps4.Pro migrated chat counts for each user. This report helps in verifying the completeness of the migration process and ensures data consistency between the source and destination environments.
Steps to Generate the Chat Migration Summary Report:
- Go to Chat → SUMMARY -> MIGRATED CHATS section.
- Click the “
 Refresh“ button to populate the values
Important:
Verify the migration of a few random user’s Chats to ensure archived chats are visible and files are accessible.
Conclusion
In summary, Apps4.Pro Migration Manager offers a reliable and efficient solution for migrating Microsoft Teams chat data to new tenants. By using this tool, administrators can ensure data accuracy and maintain seamless communication continuity. For additional assistance, explore our FAQ or contact our support team at support@jijitechnologies.com.
FAQs
The License and Roles required to perform Teams Chat Migration from one tenant to another are as below:
- Valid Microsoft 365/Office 365 License with “Microsoft Teams” app enabled is required for Source & Target Connector Accounts & all Migration Scoped Users.
- Admin consent and Application Permission is required for Source Connector Account.
- Delegated Permission is required for the Target Connector Account.
- Secondary Site Collection Admin Access is required for Target Service Account to all the scoped target user’s OneDrive when attachments have to be migrated.
Admins can provide Admin Consent & Delegate Permission just by clicking a link. Please contact presales@apps4.pro for further details.
- Configure the source and target tenants.
- Configure Private Chat in Source & configure Private chat & Teams API in Target.
- Sync app data for users.
- Navigate to the Mapping section and map all the scoped users.
- Select the users or chat to migrate.
- Initiate the migration process.
- Ensure the migrated data’s accuracy, including user memberships, files, and chat content.
Pre-requisites for Teams Chat Migration are shown below:
- OneDrive Provisioning[OPTIONAL] : Skip this if OneDrive is provisioned for all migration scoped users. If not, follow the below steps:
- Step 1: Open Windows PowerShell ISE as run as administrator
- Step 2: Download and open the attached script from PowerShellOneDrive
Provisioning Script: OneDriveProvisioning.ps1
Sample CSV: SampleUserMapping.csv - Step 3: Replace the
- AdminURL property with the target tenant SharePoint admin center URL and
- ImportPath with CSV Path of List of target user who are not provisioned in the script.
- Step 4: Run the script using a target account that holds either “SharePoint Admin” role or “Global Admin” role for proper permissions.
- Step 5: Once the script execution completed, you can close the PowerShell.
- Setup Secondary Admin Access
Target Service Account must be assigned as Secondary Admin for all the migration scoped Target users.-
- Step 1: Download the SampleUserMapping CSV file and the script.
Sample User Mapping CSV : SampleUserMapping.csv
Script : Onedrive-Secondaryadminscript.ps1 - Step 2: In the SampleUserMapping file, add the Target users’ UPNs under the UserPrincipalName column.
Ensure the SampleUserMapping file is in CSV format.
- Step 3: Open Windows PowerShell ISE as “Run as administrator”.
- Step 4: Open PowerShell script file downloaded in “Step 1”.
- Step 5: Replace the parameter values
- For the parameter “AdminURL”, input your Target tenant’s SharePoint Admin URL.
- For the parameter “ImportPath”, input the path with the updated SampleUserMapping CSV.
- For the parameter “SecondaryadminUPN”, input the UPN of your Target Service Account.
- Step 6 : Run the script.
- Step 7 : Login with Global Administrator / SharePoint Administrator credentials.
- Step 1: Download the SampleUserMapping CSV file and the script.
-
Now the Service Account gets added as Secondary admin to the users added in the CSV file.
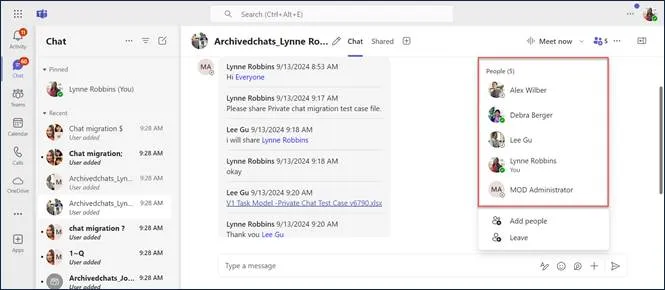
Microsoft Teams chats—including one-on-one, group, and meeting chats—are migrated as group chats, referred to as archived chats in the new tenant.
The Target Service Account, configured in the Apps4.Pro tool, will create these chats, migrate the entire conversation history, and add the original participants. As a result, the service account will appear as a member of each migrated chat.
Once the tenant-to-tenant Teams chat migration is complete, the Target Service Account can be safely removed from the migrated chats using scripts, if required.
Apps4.Pro Migration Manager offers a Merge Messages feature designed to enhance the speed of Teams chat migration between tenants. This functionality groups multiple messages and migrates them as a single consolidated message, allowing one migrated entry to contain several original messages.
By default, the merge count is set to 10, but it can be customized based on your specific requirements. This approach significantly reduces the number of API calls, thereby improving overall Teams Chat migration performance.
To Generate the Chats Migration Summary Report, follow the below steps
- Go to Chat → SUMMARY -> MIGRATED CHATS section.
- Click the “ Sync” button to populate the values.
The generated report details the total number of chats, chat ID, chat Link, chat member details in the source Teams chat, along with the Apps4.Pro migrated chat counts for each user.
Yes, Apps4.Pro supports Incremental Migration for Teams Private Chats, ensuring that new messages added to the source tenant after the initial migration and are transferred to destination tenant without duplicating existing data.
We can perform Incremental Migration with the Rerun function.
Steps to Perform Incremental Migration:
- Navigate to Chats → Tasks → Completed Tab.
- Select the Users that require Incremental Migration.
- Click ‘Rerun’ to initiate the Incremental Migration.
Yes, Apps4.Pro allows you to customize chat titles by adding a prefix or suffix. This helps in easily identifying migrated chats in the target tenant—for example, by appending “_Migrated” or adding a project-specific tag.
By default, the app generates chat titles using the participant names in the format : “SenderName_RecipientName_CustomChatTopicText”
For example: “Alex Wilber_Megan Bowen_ArchivedChat”
To customize this format, follow the steps below:
- Go to the Settings tab → Other Settings → Migration Settings → Private Chat Settings
- Enter values for:
- Custom Chat Topic Separator
- Custom Chat Topic Text
- Choose the Custom Chat Topic Text Position (e.g., prefix or suffix)
- Click Save to apply the changes.
Yes, Apps4.Pro migrates Microsoft Teams chat conversations from deleted users. However, the original sender’s name will only be retained if it can be retrieved during migration. If not, the message will appear as posted by “Unknown User.”
No, the chat messages will be posted as Unread messages in Target Tenant due to API limitations.
When chat memberships are migrated initially, members may receive notifications during the migration process. To prevent these notifications, you can disable the “Migrate Chat Membership” option, which is enabled by default.
If you prefer to migrate the chat memberships at a later stage, follow the steps below:
- Navigate to Settings → Other Settings → Private Chat Settings
- Enable the option “Migrate Chat Membership”
- Go to the Chat tab → Task → Completed tab
- Select the relevant task
- Expand the Add Membership dropdown and click Add Membership by Task
This allows you to control when the memberships are added, reducing unwanted notifications during the initial migration.
Note: Users will receive a notification when members are added to the migrated chat. This is the default behavior of the Microsoft Teams application and cannot be disabled. However, it does not affect the overall end-user experience.
We can’t align the messages by sender and receiver sides as it is in the source. This is the default behaviour due to API limitations. Instead, we will post each message with a label of the actual posted username.
Yes, it is possible to migrate specific chats instead of migrating all chats for a user.
To do this, follow the steps below:
Step 1:
Go to Chat → Source → Users.
Select the users whose specific chats you want to migrate and click ‘Sync Chats’.
This will create a “Sync Chat” task. Once the sync is complete, you can view the chat list under the CHATS tab.
Step 2:
Navigate to Chat → Source → CHATS.
All chats associated with the selected users will be displayed.
Select the specific chats you want to migrate and click ‘Migrate’.
Yes, it is possible to achieve this through the tool.
Post migration, review the migration results and once satisfied, remove the Connector Account from the migrated chats.
To do this, follow the below steps.
Generate the report by following the below steps:
- Navigate to Plan tab.
- Under Reports -> Private Chat -> Click on ‘Migrated Target Chats’ to generate the report.
- All the chats migrated to the target account are listed.
- Click to add the column Migrated from this Machine
- Filter the column “Migrated from this Machine” as true
This helps to pull chats Migrated via this machine only. When Migration is run in multiple machines, this activity has to be repeated in each machine.
- Select all the filtered chats and click on Manage Chat Members
- Under Actions, choose ‘Remove Member’ -> click + icon -> Search for the Target Connector Account & select it
- Click Update.
Yes, Apps4.Pro Migration Manager supports the migration of chats with External(Guest) Users as participants.
 Manage


 Migrate

