

Microsoft Power BI Tenant to Tenant Migration Guide
Introduction
Apps4.Pro Migration Manager simplifies the migration of Power BI reports at the user level. It is a SaaS-based tool that is easy to access. This guide provides a step-by-step process for migrating Microsoft Power BI reports between tenants using the Apps4.Pro Migration Manager. It also includes access to a Power BI inventory report during the free trial period.
It covers the migration of Power BI workspace content—including reports, datasets (semantic models), dashboards, and dataflows—from both personal and shared (group) workspaces to a new or existing workspace in the target tenant.
Scope of Microsoft Power BI Migration
The migrated and non-migrated items for Microsoft Power BI migration to a new tenant are listed below.
Roles & Licenses for Power BI Migration
- License: Valid Microsoft 365/Office 365 License with “Power BI” app enabled required for Source & Target Connector Accounts.
- Role: For Source & Target Connector Accounts, Fabric Administrator role with Admin Consent is required.
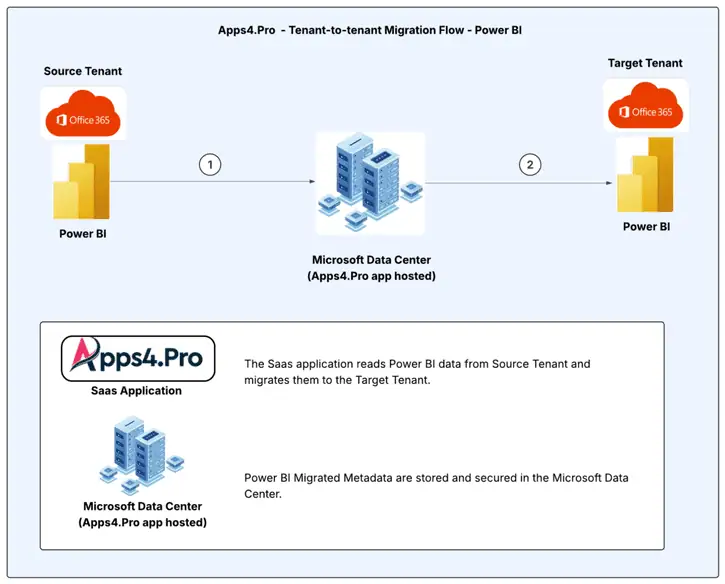
Architecture Diagram
Pre-Migration Setup for Power BI Migration
Admin Consent – [Least Privilege]
Important: This action must be completed for both the Source and Target Tenants before establishing the connections.
If your Source / Target Account is limited to a Fabric Administrator role, Admin must provide Consent just by clicking a link [Please contact us at presales@apps4.pro for the link]
- Ask the admin to open the below consent link in their browser and sign-in with the admin Account.
Note: The Tenant ID needs to be replaced in the consent link.
- Click “Accept” to provide consent to use the Apps4.Pro app.
Sign-up Process
To start using Apps4.Pro Power BI Migration Tool, follow these steps:
- Access the Signup Page: Contact us at presales@apps4.pro for the tool link and load it on the web browser.
- Login: Click on the “Login” button for your initial login.
- Sign in using Service Account on the Sign-in page, then click “Next” to continue.
- Grant Permissions: Accept the required permissions to proceed and complete the sign-in process.
Required Permissions
| Permission | Justification |
| View your basic profile | Allows the app to see your basic profile (e.g., name, picture, user name, email address) |
| Maintain access to data you have given it access to | Allows the app to see and update the data you gave it access to, even when you are not currently using the app. This does not give the app any additional permissions. |
Source Connection
- Navigate to the Setup tab, then check the Power BI checkbox and click on Configure.
- Click on the “Verify Authentication” option in the client configuration. It automatically copies the required code.
- Paste the copied code for client configuration.
- Proceed to sign in using the details of the Source Connector Account.
- Then, Accept the permissions to proceed and complete the configuration.
Required Permissions
| Permission | Justification |
| Maintain access to data you have given it access to | Allows the app to see and update the data you gave it access to, even when users are not currently using the app. This does not give the app any additional permissions. |
| Read all groups | Allows the app to list groups, and to read their properties and all group memberships on behalf of the signed-in user. Also allows the app to read calendar, conversations, files, and other group content for all groups the signed-in user can access. |
| Read all users’ full profiles | Allows the app to read the full set of profile properties, reports, and managers of other users in your organization, on behalf of the signed-in user. |
- Close the window after completing the setup. The Source Connector Account is now configured.
Target Connection
- Navigate to the Target section for setting up the Target Service Account.
- Check the Power BI checkbox to enable it and click Configure.
- Log in with the Target Connector Account credentials and accept the required permissions.
Required Permissions
| Permission | Justification |
| Maintain access to data you have given it access to | Allows the app to see and update the data you gave it access to, even when users are not currently using the app. This does not give the app any additional permissions. |
| Read all groups | Allows the app to list groups, and to read their properties and all group memberships on behalf of the signed-in user. Also allows the app to read calendar, conversations, files, and other group content for all groups the signed-in user can access. |
| Read and write all users’ full profiles | Allows the app to read and write the full set of profile properties, reports, and managers of other users in your organization, on behalf of the signed-in user. |
- Complete the configuration process. The Target Connector Account is now successfully configured.
Mapping
In order to migrate the Power BI workspace’s permissions from the Source to the Target Tenant, mapping is required for users and Office 365 groups.
User Mapping
- Navigate to the Mapping section and select the USERS tab.
- Click the
 Sync option to retrieve all users from both the Source and Target Tenants.
 - Use the following methods for user mapping:
- AutoMap: Automatically maps users with identical display names in the Source and Target Tenants.
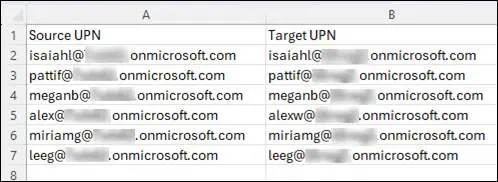
- Import CSV: For bulk updates, export and import user mappings using a CSV file.
Sample CSV
Group Mapping
- Go to the Mapping -> GROUPS tab.
- Click the Sync option to retrieve all groups from the Source and Target Tenants.
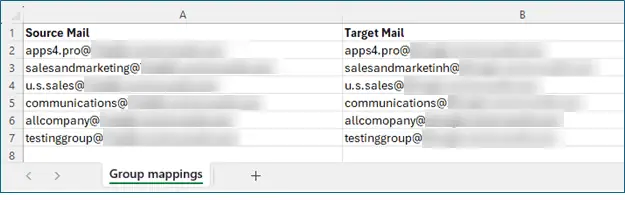
- Perform group mapping using the same methods – ‘AutoMap’ and ‘Import CSV’ similar to User Mapping.
Sample CSV
Microsoft Power BI Inventory Report
Step 1: Get All Workspaces
Navigate to the Power BI tab and click Get Latest to fetch the list of Groups and Personal Workspaces
Step 2: Select Workspaces
- Choose the desired workspace in the SOURCE section.
- Hover over the Sync Resources option and select your preferred method:
- Sync Selected Workspaces: Retrieve Reports, Datasets, and associated connections for the selected workspaces.
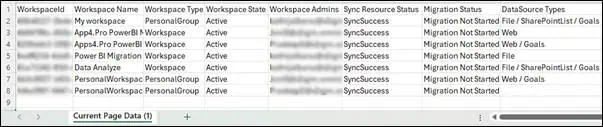
- Export Page Data as CSV: Download current page data in a CSV file for analyzing further.
You can get this csv file from Downloads folder.
- Sync Selected Workspaces from CSV: Synchronize bulk number of workspaces using an CSV file exported from the tool.
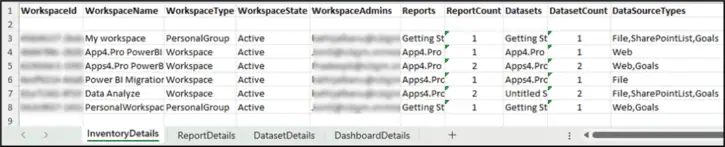
Step 3: Export Inventory Report
Generate an Inventory Report by exporting the data as an Excel file for further analysis and planning. Follow the below steps.
- Navigate to Power BI -> SOURCE.
- Click Export -> Export Inventory Report.
Sample Report
Start Power BI Migration
Step 1: Initiate Migration
- After synchronization, select the required workspaces and click Migrate .
- Choose one of the following options from the dropdown menu:
- Migrate Selected Workspaces: Migrate only the chosen workspaces.
- Migrate Selected Workspaces from CSV: Use an CSV file to migrate multiple workspaces efficiently.
Step 2: Export and Import Mappings [OPTIONAL]
Use this option to save and review mapping configurations before initiating the migration.
Export Mappings
- Navigate to Power BI -> SOURCE
- Select the Workspaces whose mapping you need to Export
- Click Export -> Export Mappings for Migration
Sample Exported Mapping

Import Mappings
Apply updated mappings using the Import Mappings option for a smooth transition.
Step 3: Mapping Details
During the migration process, the following components must be mapped:
Users and Groups
- Ensure all user Accounts are accurately mapped from Source to Target.
- Map group memberships to preserve collaboration settings.
Workspaces, Reports, Datasets, and Data Sources
- Identify and map Source workspaces to their corresponding Target workspaces.
- Rename Target workspaces as needed by selecting and editing their names.
- Follow similar steps for mapping Reports, Datasets, and Data Sources.
Data Source
You can set the Source Connection value in the Target by selecting the option“ ![]() Set source value”. After reviewing all the mappings, click PROCEED to initiate the workspace migration.
Set source value”. After reviewing all the mappings, click PROCEED to initiate the workspace migration.
Step 4: Monitor Migration Tasks
After initiating the migration, tasks are created for each workspace. You can monitor the progress and check the status in the Tasks section.
- Task in Queue:
After task creation, it enters the Queue section, awaiting processing. - Task in InProgress:
The task then moves to In Progress, where migration begins. During this stage, all Workspaces, Reports, Datasets, and Data Sources are transferred from the Source to the Target. - Task in Pause:
The task can be paused if needed, temporarily halting the cross-tenant Power BI migration process. - Task completed:
Once the migration is successfully completed, the task moves to the Completed section. - View Details: You can check the detailed summary of the completed tasks using this option.
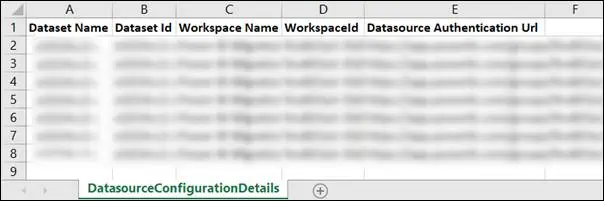
Step 5: Export Data Source URLs as Excel
Once the migration is complete, you can export the Data Source redirect URL into an Excel file from SOURCE -> Export -> “Export Data Source URLs as Excel”.
Note: These URL helps end users take ownership of the migrated workspaces.
Sample Excel File
Troubleshoot
If you require support or guidance on the errors, warnings or non-migrated items, reach our Support Team at support@jijitechnologies.com for further analysis.
Conclusion
In conclusion, Apps4.Pro Migration Manager simplifies and secures the migration of Power BI data between Office 365 tenants, ensuring a smooth process with no data loss. By following the provided steps, you can confidently transfer your Power BI workspaces, reports, and datasets. For further assistance or inquiries, please consult our FAQ or reach out to our support team at support@jijitechnologies.com.
 Migrate
 Manage

