

Microsoft Exchange Mailbox Tenant to Tenant Migration Guide
Introduction
The Apps4.Pro Migration Manager guide provides a step-by-step process for migrating various Exchange mailboxes-such as user, shared, group, in-place archive, and public folders from one Microsoft 365 tenant to another Microsoft 365 Tenant.
It covers all essential components of Office 365 Exchange Online Mailbox migration, including emails, folders, calendars, contacts, tasks, rules, and attachments, ensuring a seamless transfer without any data loss.
Apps4.Pro Migration Manager also supports migrating emails based on selected date ranges, allowing you to transfer only the emails within the specified timeframe.
Scope of Mailbox Migration
The migrated and non-migrated items are listed below for Office 365 Mailbox Migration.
Limitations
- Hidden Mails / Folders: System-generated or hidden folders will not be migrated.
- Calendar Meeting Links: Meeting links will reference the Source Tenant and will not function in the Target Tenant. You will need to manually resend the events for them to work correctly in the Target.
Roles & Licenses for Mailbox Migration
- License: All the users scoped for migration should have valid Microsoft 365 / Office 365 License with “Exchange Online” app enabled in both Source and Target tenant.
- Role: Both the Source and Target connection configuration Accounts can be a normal user and need Admin consent for delegated permissions.
- Subscription: Source or Target tenant should have a Pay-As-You-Go (PAYG) Subscription to create Azure Storage Account.
Admin Consent for Delegated Permissions are required for Apps4.Pro to securely access and migrate data across Microsoft 365 workloads. These permissions facilitate authentication and authorization, ensuring a smooth migration while maintaining data integrity.
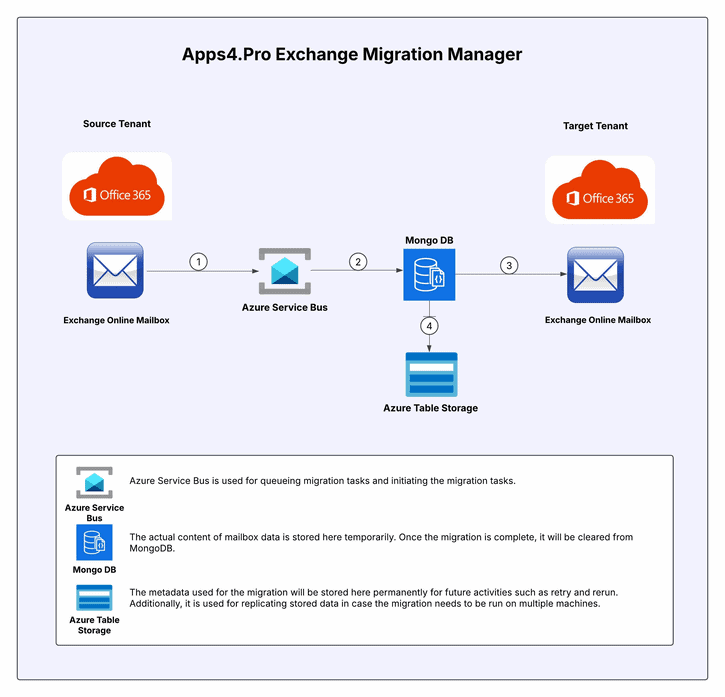
Architecture Diagram
Mailbox Inventory Report
Follow the below steps to export the Inventory Report of source tenant personal mailbox and shared mailbox storage size.
Step 1 : Open Windows PowerShell ISE as run as administrator
Step 2 : Download and open the attached script from PowerShell
Script File Link : GetPersonalMailboxStorage.ps1
Step 3 : Update the $mailboxStorageReportPath variable with the local “path to export the mailbox details” in the script.
Step 4 : Execute the script, and once it runs successfully, you will find the csv file saved in the location specified in the $mailboxStorageReportPath variable within the script.
Note:
Ensure the script is executed using an account that holds either the “Exchange Admin” role or the “Global Admin” role for proper permissions.
Sample Output file : PersonalAndSharedMailboxStorageReport.csv
Pre-Migration Setup for Mailbox Migration
Minimum System Requirements
Azure VM with following specifications
- 4 core CPU
- 16 GB RAM
- Windows 10 & above
- Region of VM must be same as Target tenant’s Data Center Location
Other Requirements
You would also need to prepare the below items to migrate Exchange Online content. The configuration of these items is explained in detail in the following part of the document.
- Configure Azure AD Application: Requires Global Administrator consent.
- Create Azure Storage Account: Required to store Migration Data like Task details, Migration Summary details and Error logs.
- Create Public Folder Mailbox & Add Root Permission [OPTIONAL]: Required only when Public Folders are part of your Migration Scope.
- Enable Archive Mailbox and Retention Policy [OPTIONAL]: Required only when Archive Mailboxes are part of your Migration Scope.
- Disable EWS throttling in both Source and Target tenant for better performance.
- Execute PowerShell script to Increase default mail attachment size in Source and Target tenants
Configure Azure AD Application
Note:
Azure Application can be created from the Apps4.Pro tool also.
Get Application (client) ID
- Log in to the Microsoft Entra admin center in Source or Target tenant with a Global Administrator account.
- In the left sidebar, open the Applications dropdown list and select ‘App registrations’.
- Select ‘+ New registration’ at the top of the screen.
- Enter any unique name for the application.
- Supported account types – choose the option “Select the Accounts in any organizational directory (Any Microsoft Entra ID tenant – Multi Tenant)”.
- Click Register.
- In the Overview, copy the Application (client) ID to Notepad for later use during the “Apps4.Pro” Setup configuration.
Set Redirect URI
- Under the Manage menu, select Authentication. Click ‘+Add a platform’ button and select the Mobile and desktop applications.
- Enable the checkbox next to the following Redirect URI: https://login.microsoftonline.com/common/oauth2/nativeclient
- Replace the {client_id} below with the Azure AD App’s Client ID copied from the previous step and enter the URL in the Custom redirect URIs field. Click Configure.
ms-appx-web://microsoft.aad.brokerplugin/{client_id} - Verify that the configured Redirect URIs are listed under Mobile and Desktop applications Redirect URIs.
Set Microsoft Graph API permissions
- From the Manage menu, select API permissions.
Important:
If an API permission named User.Read under Microsoft Graph is already present, remove it.
- Click ‘+Add a Permission’ and select Microsoft Graph under Microsoft APIs.
- Select Application permissions
- Search for the following permissions, select them, and click Add Permissions.
- Group.Read.All
- User.Read.All
- MailboxSettings.Read
Set Office 365 Exchange Online API permissions
- Click ‘+Add a Permission’ and select APIs my organization uses.
- Search for Office 365 Exchange Online and click on it.
- Select Application Permissions, search for the following permissions, select them, and click Add Permissions.
- full_access_as_app
Set Client Secret
- Select Certificates & secrets under the Manage menu.
- Click on ‘+New client secret’ under the Client secrets tab
- Enter a description
- Set the expiry time (select the maximum value)
- Click Add.
- Copy the secret value (under the Value column) and save it in Notepad for later use during the “Apps4.Pro” configuration.
Create Azure Storage Account and Get Connection String
Note:
The Azure Storage Account must be created with same region as Target tenant’s Data Center Location.
Follow the steps below to create Azure Storage Account
Step 1: Login to Azure Portal using the link below.
Recommended:
You can login either with Source or Target tenant. But make sure it has an active Azure Subscription.
Step 2: Search for “Storage Accounts” and click on it
Step 3: Click on “+ Create” button
Step 4: Fill in the required details as mentioned below, and click “Review + create”
Subscription – Valid subscription that the logged in account has access
Resource group – New dedicated resource group for Exchange migration
Storage Account name – Any unique name
Region – Select Target tenant region
Performance – Standard (Default)
Redundancy – Locally – Redundant Storage (LRS)
Step 5: Click on Create and wait for a few seconds for Deployment.
Step 6: Once deployment completed, click on “Go to resource”
Step 7 : From the left side menu, scroll down and expand “Settings” dropdown. Click on “Resource sharing (CORS)”
Step 8: Configure below CORS Values for both “Blob Service” and “Table Service”
Blob Service:
Allowed Origins: http://localhost:5010
Allowed Methods: GET, HEAD, PUT
Allowed Headers: *
Exposed Headers: *
Max Age: 60 seconds
Table Service:
Allowed Origins: http://localhost:5010
Allowed Methods: GET, HEAD, PUT
Allowed Headers: *
Exposed Headers: *
Max Age: 60 seconds
Step 9: From the left side menu, scroll up and expand “Security + Networking”. Click on “Access Keys”.
Copy the “Connection String” under “key1”. Copy and note this value in a notepad which is required to input in Apps4.Pro Migration Manager after installation.
Pre-requisites for Public folder Migration
Note:
This step is OPTIONAL. It is required only if Public Folder(s) is part of your Migration Scope.
If you want to migrate Public Folder(s), create at least one Public Folder Mailbox in the Target tenant manually. This involves 2 steps.
Step 1 : Create Public Folder Mailbox
- Go to Exchange admin center in Target tenant.
- From the left side Menu, navigate to Public folders -> ‘Public folder mailboxes’ tab.
- Click “+ Add a public folder mailbox”.
- Give a name.
- Click ‘Add’.
Step 2 : Add Root permission
- Go to Exchange admin center in Target tenant
- From the left side Menu, navigate to Public folders -> ‘Public folders’ tab -> Root permissions
- Click “+ Add permissions”. Provide the values below
- User: Target Service Account
- Permission level – Owner
- Permission options – Select All
Pre-requisites for Archive Mailbox Migration
Note:
This Step is OPTIONAL. It is required only when Archive Mailbox is part of your Migration Scope.
Enable Archive Mailbox for the Target users
Follow the below steps for all the Scoped Target users for whom Archive Mailbox is part of the Migration scope.
- Go to “Exchange Admin center” in target tenant
- From the left side Menu, navigate to Recipients -> Mailboxes
- Click on specific User Mailbox
- Go to “Others” tab
- Click “Manage mailbox archive” option
- Enable “Mailbox archive status” option
- Click “Save”
Apply retention policy in Target Tenant
You need to apply the retention policy in Target Tenant same as in Source Tenant. Follow the below steps.
Set MRM Retention tags and policies
- Go to Microsoft Purview Compliance Portal using below link https://purview.microsoft.com
- From the left side menu, Click on “Solutions”
- Click on “Data Lifecycle Management”
- Under “Exchange (legacy)” section, Click “MRM Retention tags”.
- Verify if the listed Retention tags and its properties are same as Source Tenant. If not, you need to update it manually.
- Now, click “MRM Retention policies”.
- Verify if the listed Retention Policies and its tags are same as Source Tenant. If not, you need to edit and configure it manually.
Set Retention policy for Target User Mailboxes
Repeat the below steps for all the Target Users in Scope
- Go to Exchange admin center.
- Under “Recipients” section, click on “Mailboxes”.
- Click on specific mailbox, Go to “Mailbox” tab.
- Under “Retention policy”, click “Manage mailbox policies”.
- Set the “Retention policy” value same as Source Mailbox.
Disable EWS throttling in both Source and Target tenant
For a better performance during Migration, disable EWS throttling in both Source and Target tenants by following the below steps.
- Login to Microsoft 365 Admin portal [https://admin.microsoft.com]
- Navigate to Help using
 icon in the top right corner and enter “EWS Throttling Policy Increase” in the search and click
  .
. - Click “Run Tests”
- If throttling is enabled, it will provide you with the option to change the throttling policy.
- Provide the duration as 90 days (maximum value) and click “Update”.
- Run the test again after 15 minutes to confirm if throttling is removed.
Increase default mail attachment size in Source and Target tenants
To increase mailbox attachment size for the required users in the Source and Target tenants, follow the below steps.
Step 1: Open Windows PowerShell ISE as ‘Run as administrator’
Step 2: Prepare a CSV containing the mailbox UPN List
Sample CSV Input File Format:

Step 3: Download and open the attached script from PowerShell
Script to increase attachment size limit: IncreaseDefaultAttachmentSize-Exchange.ps1
Note:
In this script, the size is set to the maximum size of 150 MB.
Step 4: Replace the $csvPath value with the CSV file path prepared in Step 2.
Step 5: Run ![]() the script using user with the “Global Admin” or “Exchange Admin” role
the script using user with the “Global Admin” or “Exchange Admin” role
Note:
By default, Exchange Online mailboxes have a 36 MB attachment size limit. However, users may have increased this limit to upload larger attachments. You must increase the attachment size limit to the maximum limit.
- On Target mailboxes to enable the EWS Managed API to upload attachments exceeding the default size.
- On Source mailboxes, to enable the EWS Managed API to successfully read attachments exceeding the default size.
Setup Installation
Contact us at presales@apps4.pro to get the latest version of the Mailbox Migration tool for download and installation.
Initial Login Configuration
- Open the “Apps4.Pro Exchange Migration Manager” using the desktop shortcut
- Click on the LOGIN button and Sign-in using the Source Service Account credentials.
Pre-requisite Configuration
- Once the initial log-in is done, the app will direct to the Prerequisites tab. Click on the LAUNCH button.
- A pop-up window will open. Under the DATA STORAGE section, enter the Connection String of Azure Table storage (Refer : Create Azure Storage Account and Get Connection String) and click on Save.
- Under Setup section >> Application Registrations, Choose Manual Registration, enter the Client ID and Client Secret copied from the Configure Azure AD Application step, and click Save. Click on Next.
Connection configuration for both Source and Target tenants
Case 1 : When the Service Accounts does not have Global admin privileges
Step 1: Admin Consent
- From the “Connections” tab, click the “Copy Admin Consent URL” option to copy the consent URL to your clipboard.
- Share the copied URL with your Global Administrator of both Source and Target tenants, and ask them to complete the following steps:
- Open the consent URL in a web browser.
- Sign in using a Global Admin Account.
- Enable the checkbox: “Consent on behalf of your organization.”
Requested Delegated Permissions for Source Tenant
| Permission | Justification |
| Group.Read.All | Used to read details of all mail enabled groups from source tenant. |
| User.Read.All | Used to read details of all mail enabled users from source tenant. |
| MailboxSettings.Read | Used to extract the list of mail enabled users from source tenant. |
| full_access_as_app | Used to connect the source mailbox and perform migration activities such as read content. |
Requested Delegated Permissions for Target Tenant
| Permission | Justification |
| Group.Read.All | Used to read details of all mail enabled groups from target tenant. |
| User.Read.All | Used to read details of all mail enabled users from target tenant. |
| MailboxSettings.Read | Used to extract the list of mail enabled users from target tenant. |
| full_access_as_app | Used to connect the target mailbox and perform migration activities such as write content. |
- Click “✅ Accept” to grant the requested delegated permissions.
- Once these steps are completed, the Azure AD application will have the required applications permissions in the Source and Target tenants
Step 2: Enter Login Information
Method 1 (No sign-in required)
- Under the “Source Service Account” section, enter the TenantID of and UserPrincipalName of Source Service Account user and click on Save
- Wait for the success message box to appear with message ‘Successfully Configured’.
- Click on “Ok” and proceed with the next steps
Note:
Follow the above steps for “Target Service Account” also.
Method 2
- Under the “Source Service Account” section, click on “Login” button
- Sign in with the Source Service Account credentials
- Enable the checkbox: “Consent on behalf of your organization.”
- Click “Accept” to grant the requested permissions.
Requested Permissions:
| Permission | Justification |
| Maintain access to data you have given it access to | Allows the app to see and update the data you gave it access to, even when you are not currently using the app. This does not give the app any additional permissions. |
| View user’s basic profile | Allows the app to see your basic profile (e.g., name, picture, user name, email address) |
- Wait for the success message box to appear with message ‘Successfully Configured’.
- Click on “Ok” and proceed with next steps.
Note:
Follow the above steps for “Target Service Account” also.
Case 2 : When Source and Target Service Accounts have Global admin privileges
- Under the “Source Service Account” section, click on “Configure” button
- Sign-in with the Source Service Account credentials
- Review the listed permissions and click on “Accept” to grant consent and add connection
Requested Permissions:
| Permission | Justification |
| Use Exchange Web Services with full access to all mailboxes | Allows the app to have full access via Exchange Web Services to all mailboxes without a signed-in user. |
| Read all groups | Allows the app to read group properties and memberships, and read conversations for all groups, without a signed-in user. |
| Read all user mailbox settings | Allows the app to read user’s mailbox settings without a signed-in user. Does not include permission to send mail. |
| Read all user’s full profiles | Allows the app to read user profiles without a signed in user. |
| Sign in and read user profile | Allows the app to read the profile of signed-in users. It also allows the app to read basic company information of signed-in users. |
Note:
Follow the above steps for “Target Service Account” also
Once completed the above steps, close this pop up, and proceed with further steps.
User and Group Mappings
User Mapping:
- Navigate to the Mapping tab, and under the USERS section, click Sync to retrieve all users in the tenant.
- AutoMap: Use this option to automatically map users based on their display names.
- You can use the Import CSV option to map users with different display names.
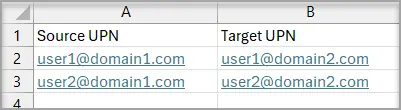
Import CSV Sample Format for User Mapping
Group Mapping:
- Navigate to the GROUPS tab and click Sync to retrieve group information.
- AutoMap: Use this option to automatically map groups based on their display names
- You can use the Import CSV option to map groups manually if their display names differ.
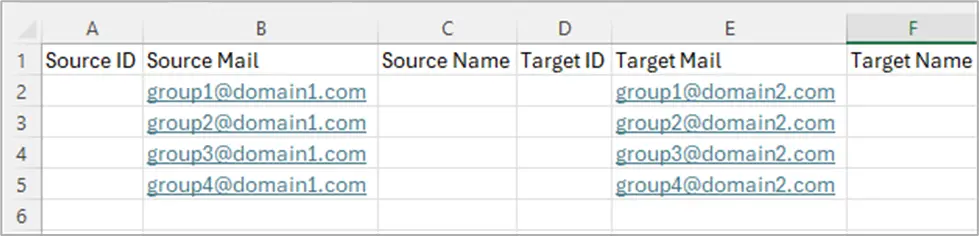
Import CSV Sample Format for Group Mapping
Migration Settings Configuration
- Navigate to the Settings tab.
- Workload Selection : Select the workloads you need to migrate and deselect any unnecessary ones.
Workloads available for Migration
- Mailbox
- Tasks
- Contacts
- Calendars
- Public Folders
- Archive Mailboxes
- Group Mailboxes
- Group Calendars
- Mailbox Rules
- Recipient Mappings : Customize the UPN in email headers (From, To, CC, Bcc) for the Target tenant using these settings.
- Same as Source Domain: Use this option to retain the same user domain for all users in the Target tenant after migration.
- Custom Domain: If you have multiple domains in the Target tenant, choose which domain should replace all users during migration.
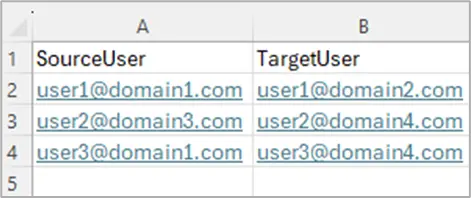
Sample CSV:
- Rules Settings
Customize the UPN in the Inbox rules for the Target tenant using these settings.
- Same as Source Domain: Use this option to retain the same user domain for all users in the Target tenant after migration.
- Import CSV: Customize the domain for each user by importing a CSV file.
Sample CSV:
- Timer Settings
- Initiate Timer: When enabled, it starts migration for all queued tasks automatically (enabled by default).
- Reset Timer: When enabled, tasks you create will appear in the Queued tab, and you will need to start them manually.
Once all the above preparatory steps are done, you are ready to create a Migration Task.
Note:
We recommend running a small Pilot Migration (perhaps one or two mailboxes) before moving all mailboxes, to validate your setup and measure throughput.
Start Mailbox Migration
Create Task
- Navigate to the Exchange section -> SOURCE tab to retrieve available Users, Groups, and Shared Mailboxes in the Source tenant.
- Select the desired User, Group, and Shared Mailboxes by checking their respective checkboxes, then click on Migrate.
You can initiate up to 10 jobs simultaneously. - A pop-up window will open.
- The Validation section will indicate whether the selected Mailboxes are eligible for Exchange Cloud Migration. If no warnings or errors are displayed, proceed to the next step.
- The Mapping details section will show all mapped and unmapped Users and Groups. Verify them and continue to the next step. Add mapping for the unmapped Users as applicable.
- In the Exchange Details section, verify and modify the Exchange Settings if required.
- Click on PROCEED to create the migration task.
Task Status
You can track the progress and migration status in the TASKS section.
- Task in Queue:
After task creation, it enters the Queue section, awaiting processing.
- Task in InProgress:
The task then moves to In Progress, where migration begins. During this stage, all documents are processed, and files are transferred from the Source to the Target.
- Task in Pause:
The task can be paused if needed, temporarily halting the cross-tenant mailbox migration process.
- Task completed:
Once the migration is successfully completed, the task moves to the Completed section.
View Details : You can check the detailed summary at mail folder level of the completed tasks using this option.
A Summary Report is shown with the below count of Emails folder-wise.
- Total Count
- Success Count
- Failed Count
- Warning Count
Don’t worry
If you’ve executed the above steps, the migration will run smoothly. And if anything does hiccup, our tool’s retry and incremental migration features have you covered.
How to Retry the task?
The Retry function helps resolve errors when a task is completed with an error.
Steps to Perform Retry:
- Navigate to Exchange → Tasks → Completed tab.
- Identify the tasks with a non-zero number of errors in columns “FolderErrorCount” & “ItemErrorCount”.
- Select the task you want to retry.
- Click ‘Retry’ to reattempt the migration.
How to trigger ‘Incremental Migration’?
The Rerun function enables incremental migration for newly added items in the Source User’s Mailbox after the initial migration.
Steps to Perform Incremental Migration:
- Navigate to Exchange → TASKS → COMPLETED Tab.
- Select the Tasks that require Incremental Migration.
- Click ‘Rerun’ to initiate the Incremental Migration.
Note:
If the columns “FolderErrorCount” & “ItemErrorCount” has a non-zero number of errors, review the errors with the support team before proceeding with the Incremental Migration.
Troubleshoot
If you require support or guidance on the errors, warnings or non-migrated items, get the logs and mail them to support@jijitechnologies.com for further analysis.
To get the logs, go to Exchange Tab >> TASKS >> COMPLETED tab >> Select all tasks that are completed with Error and Warning count. Click “Export Logs” option.
Reports
Exchange Migration Summary Report
The “Exchange Migration Summary” report provides a comprehensive overview of the Apps4.Pro migration, detailing the total count of success and failed counts of
- Mails
- Contacts
- Calendars
- Contacts
- Tasks
- Public Folder
- Archive Mails
To view the report, navigate to Exchange → MIGRATION SUMMARY tab.
Filter: You can use the filter at the top right to filter tasks based on their status – All, InProgress, Completed, Paused.
Mails Count: This column gives the information on the Total count of mails along with the Success and failed count.
This report helps ensure the completeness of the migration process and verifies data consistency between the source and destination environments.
Conclusion
In summary, using Apps4.Pro Migration Manager for Exchange Online Mailbox migration ensures a smooth and effective transfer of mailbox data, including emails, folders, calendars, contacts, rules, and tasks. By following the outlined steps, you can confidently migrate Exchange mailbox content between Office 365 tenants. For further assistance or inquiries, refer to our FAQ or contact our support team at support@jijitechnologies.com.
FAQs
The License and Roles required to perform Exchange Online Mailbox Migration are as below:
- License : All the users scoped for migration should have valid Microsoft 365/Office 365 License with “Exchange Online” app enabled in both Source and Target tenant.
- Role : Both the Source and Target connection configuration accounts can be a normal user and need Admin consent – Admin consent can be granted via a generated URL in the application.
- Subscription : Source or Target tenant should have a Pay-As-You-Go (PAYG) Subscription to create Azure Storage Account.
- Register and configure Azure AD apps in both tenants with required API permissions.
- Set up a storage account in the target tenant for temporary data storage.
- Assign Global or Migration Admin roles in both tenants.
- Ensure all source and target mailboxes are active and ready.
- Download and configure Apps4.Pro Migration Manager with tenant credentials.
If you want to migrate Public Folder(s), create at least one Public Folder Mailbox in the Target tenant manually. This involves 2 steps.
Step 1 : Create Public Folder Mailbox
-
- Go to Exchange admin center in Target tenant.
-
- From the left side Menu, navigate to Public folders -> ‘Public folder mailboxes’ tab.
-
- Click “+ Add a public folder mailbox”.
-
- Give a name.
-
- Click ‘Add’.
Step 2 : Add Root permission
-
- Go to Exchange admin center in Target tenant
-
- From the left side Menu, navigate to Public folders -> ‘Public folders’ tab -> Root permissions
-
- Click “+ Add permissions”. Provide the values below
- User : Target Service Account
- Permission level – Owner
- Permission options – Select All
- Click “+ Add permissions”. Provide the values below
Follow the below steps to export the Inventory Report of source tenant personal mailbox and shared mailbox storage size.
Step 1 : Open Windows PowerShell ISE as run as administrator
Step 2 : Download and open the attached script from PowerShell
Script File Link: GetPersonalMailboxStorage.ps1
Step 3 : Update the $mailboxStorageReportPath variable with the local “path to export the mailbox details” in the script.
Step 4 : Execute the script, and once it runs successfully, you will find the csv file saved in the location specified in the $mailboxStorageReportPath variable within the script.
Ensure the script is executed using an account that holds either the “Exchange Admin” role or the “Global Admin” role for proper permissions.
Sample Output file : PersonalAndSharedMailboxStorageReport.csv
For a better performance during Migration, disable EWS throttling in both Source and Target tenants by following the below steps.
-
- Login to Microsoft 365 Admin portal [https://admin.microsoft.com]
-
- Navigate to Help using icon in the top right corner and enter “EWS Throttling Policy Increase” in the search and click .
- Navigate to Help using
-
- Click “Run Tests”
-
- If throttling is enabled, it will provide you with the option to change the throttling policy.
-
- Provide the duration as 90 days (maximum value) and click “Update”.
-
- Click “Run Tests”
-
- Run the test again after 15 minutes to confirm if throttling is removed.
- Go to Exchange admin center
- Select the user
- Click on the ‘Others’ tab
- Enable archive mailbox under the ‘Mailbox archive’ option.
Navigate to the Mapping tab, and under the USERS section, click ![]() Sync to retrieve all users in the tenant.
Sync to retrieve all users in the tenant.
Exchange >> SOURCE >> ‘Get Latest’ option will retrieve the latest data from all mailboxes that includes any newly created mailboxes.
- Download and set up the migration tool with tenant credentials.
- Generate a pre-migration report to identify data for migration.
- Map Source and Target tenant users.
- Select Mailboxes, configure settings, and start the migration.
- Monitor progress and confirm successful migration.
The Source Mailbox remains active, and users can still access it if needed during the Migration Process, ensuring that no data is lost.
The Rerun function enables incremental migration for newly added items in the Source User’s Mailbox after the initial migration.
Steps to Perform Incremental Migration:
-
Navigate to Exchange → TASKS → COMPLETED Tab.
-
Select the Tasks that require Incremental Migration.
-
Click ‘Rerun’ to initiate the Incremental Migration.
If the columns “FolderErrorCount” & “ItemErrorCount” has a non-zero number of errors, review the errors with the support team before proceeding with the Incremental Migration.
The duration of an Exchange Online Mailbox Migration depends on factors such as mailbox size, the number of mailboxes, and network speed. Individual mailboxes may take minutes to hours, while larger migrations can take some days.
Yes, Apps4.Pro Migration Manager allows you to selectively migrate specific data like emails, folders, contacts, calendars, tasks, and rules, ensuring a tailored migration.
Yes, Apps4.Pro Migration Manager supports migrating emails from selected date ranges, allowing you to transfer only the emails within the specified timeframe.
- Verify the mail domain in the target tenant.
- Map and sync mailboxes with Apps4.Pro before the cut-over.
- Perform a delta sync to transfer remaining data.
- Mail flow and verify functionality.
- Communicate with users about the transition.
 Manage


 Migrate

